
티스토리 뷰
스프링 부트 웹 애플리케이션 제작(37): HTML 템플릿 생성 및 메일 전송
Jaime.Lee 2022. 4. 10. 10:30
본 포스팅은 백기선님의 스프링과 JPA 기반 웹 애플리케이션 개발 강의를 참고하여 작성하였습니다.
소스 코드는 여기 있습니다. (commit hash: c4984db)> git clone https://github.com/lcalmsky/spring-boot-app.git > git checkout c4984dbℹ️ squash merge를 사용해 기존 branch를 삭제하기로 하여 앞으로는 commit hash로 포스팅 시점의 소스 코드를 공유할 예정입니다.
Overview
Thymeleaf 템플릿을 이용해 이메일 템플릿을 작성합니다.
템플릿 작성
템플릿 위치에 디렉토리를 하나 생성하고 하위에 이메일 템플릿을 HTML로 작성합니다.
/src/main/resources/templates/mail/simple-link.html
<!DOCTYPE html>
<html lang="en" xmlns:th="http://www.thymeleaf.org">
<head>
<meta charset="UTF-8"/>
<title>Webluxible</title>
</head>
<body>
<div>
<p>안녕하세요, <span th:text="${nickname}">닉네임</span>님!</p>
<h3 th:text="${message}">메시지</h3>
<div>
<a th:href="${host} + ${link}" th:text="${linkName}">Link</a>
<p>링크가 동작하지 않는 경우에는 아래 URL을 웹브라우저에 복사해서 붙여 넣으세요.</p>
<small th:text="${host} + ${link}"></small>
</div>
</div>
<footer>
<small>Webluxible© 2021</small>
</footer>
</body>
</html>
Properties 설정
이메일 링크 클릭시 바로 다시 서비스로 진입하기 위해선 호스트 정보를 같이 제공해야 하는데, 환경별로 호스트가 다를 수 있습니다.
따라서 설정파일에 해당 내용을 추가해줍니다.
/src/main/resources/application-local.yml/src/main/resources/application-local-db.yml
# 생략
app:
  host: http://localhost:8080
application-local.yml 전체 보기
spring:
  datasource:
    username: sa
    password:
    driver-class-name: org.h2.Driver
    url: jdbc:h2:mem:test
  h2.console:
    enabled: true
  jpa:
    hibernate:
      ddl-auto: create-drop
    properties:
      hibernate:
        format_sql: true
logging:
  level:
    org.hibernate:
      SQL: debug
      type.descriptor.sql.BasicBinder: trace
app:
  host: http://localhost:8080
application-local-db.yml 전체 보기
spring:
  datasource:
    username: testuser
    password: testpass
    url: jdbc:postgresql://localhost:5432/testdb
    driver-class-name: org.postgresql.Driver
  jpa:
    hibernate:
      ddl-auto: update
    properties:
      hibernate:
        format_sql: true
  mail:
    host: smtp.gmail.com
    port: 587
    username: account-created
    password: app-password-issued
    properties:
      mail.smtp.auth: true
      mail.smtp.timeout: 5000
      mail.smtp.starttls.enable: true
logging:
  level:
    org.hibernate:
      SQL: debug
      type.descriptor.sql.BasicBinder: trace
app:
  host: http://localhost:8080
설정 클래스 추가
애플리케이션 관련 설정을 읽어오는 클래스를 하나 생성합니다.
/src/main/java/io/lcalmsky/app/config/AppProperties.java
package io.lcalmsky.app.config;

import lombok.Data;
import org.springframework.boot.context.properties.ConfigurationProperties;
import org.springframework.stereotype.Component;

@Data
@Component
@ConfigurationProperties("app")
public class AppProperties {
    private String host;
}
@ConfigurationProperties 애너테이션을 이용해 설정파일의 app prefix 하위에 있는 항목들을 주입받아 사용할 수 있습니다.
@Component로 등록하여 외부에서 의존성을 주입할 수 있게 하였습니다.
AccountService 수정
메일 전송하는 부분을 수정합니다.
/src/main/java/io/lcalmsky/app/account/application/AccountService.java
@Service
@RequiredArgsConstructor
@Transactional
@Slf4j
public class AccountService implements UserDetailsService {

    // 생략
    private final TemplateEngine templateEngine; // (1)
    private final AppProperties appProperties; // (2)
    // 생략
    public void sendVerificationEmail(Account newAccount) { // (3)
        Context context = new Context();
        context.setVariable("link", String.format("/check-email-token?token=%s&email=%s", newAccount.getEmailToken(),
                newAccount.getEmail()));
        context.setVariable("nickname", newAccount.getNickname());
        context.setVariable("linkName", "이메일 인증하기");
        context.setVariable("message", "Webluxible 가입 인증을 위해 링크를 클릭하세요.");
        context.setVariable("host", appProperties.getHost());
        String message = templateEngine.process("mail/simple-link", context);
        emailService.sendEmail(EmailMessage.builder()
                .to(newAccount.getEmail())
                .subject("Webluxible 회원 가입 인증")
                .message(message)
                .build());
    }
    // 생략
    public void sendLoginLink(Account account) { // (4)
        Context context = new Context();
        context.setVariable("link", "/login-by-email?token=" + account.getEmailToken() + "&email=" + account.getEmail());
        context.setVariable("nickname", account.getNickname());
        context.setVariable("linkName", "Webluxible 로그인하기");
        context.setVariable("message", "로그인 하려면 아래 링크를 클릭하세요.");
        context.setVariable("host", appProperties.getHost());
        String message = templateEngine.process("mail/simple-link", context);
        account.generateToken();
        emailService.sendEmail(EmailMessage.builder()
                .to(account.getEmail())
                .subject("[Webluxible] 로그인 링크")
                .message(message)
                .build());
    }
    // 생략
}
- HTML 메시지를 생성하기 위해
TemplateEngine을 주입받습니다. - 호스트 정보를 획득하기 위해
AppProperties를 주입받습니다. - 가입시 이메일 전송하는 부분을 수정합니다.
- 이메일로 로그인하는 부분을 수정합니다.
테스트
애플리케이션을 실행(local-db 프로파일 사용)한 뒤 유효한 이메일을 사용해 가입합니다.
⚠️ WARNING:
로컬 DB에 사용하시는 메일을 이용해 이미 가입한 적이 있으면 추가 가입이 안 되므로 테스트를 위해 데이터를 지우고 시작하셔야 합니다.
가입 후 인증 메일을 확인합니다.

HTML 포맷이 적용된 것을 확인할 수 있습니다.
메일로 전송된 링크를 클릭하면,
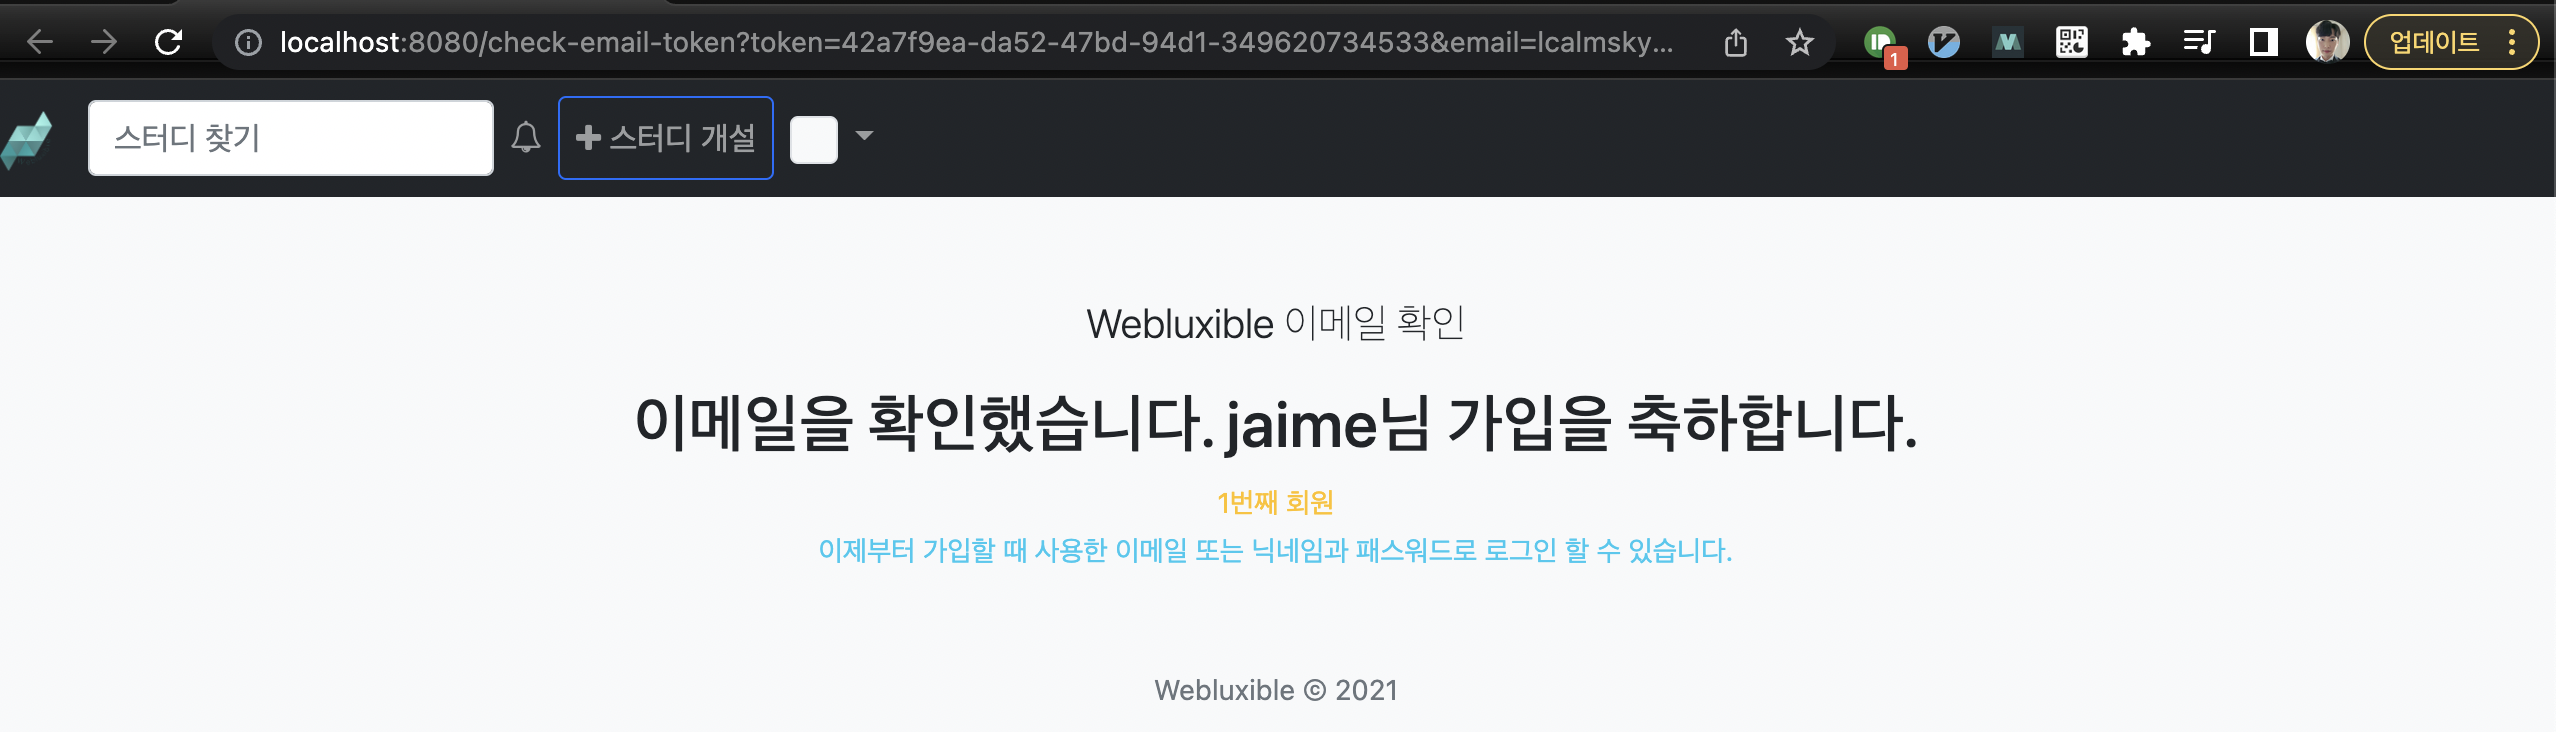
가입이 정상적으로 처리되는 것을 확인할 수 있습니다.
여기까지 개인 정보 관리쪽은 거의 완료가 되었습니다.
다음 포스팅부터는 이 애플리케이션의 메인 기능인 스터디 관련 기능 구현을 진행하도록 하겠습니다.
'SpringBoot > Web Application 만들기' 카테고리의 다른 글
| 스프링 부트 웹 애플리케이션 제작(39): 스터디 생성 기능 구현 (0) | 2022.04.12 |
|---|---|
| 스프링 부트 웹 애플리케이션 제작(38): 스터디 도메인 설계 (0) | 2022.04.11 |
| 스프링 부트 웹 애플리케이션 제작(36): 메일 서비스 추상화 (0) | 2022.04.06 |
| 스프링 부트 웹 애플리케이션 제작(35): SMTP 설정(feat. Gmail) (0) | 2022.04.05 |
| 스프링 부트 웹 애플리케이션 제작(34): 로컬 DB 설정(postgreSQL) (0) | 2022.04.04 |
- Total
- Today
- Yesterday
- @ManyToOne
- gRPC
- spring boot app
- Jackson
- 스프링부트
- spring boot application
- Java
- 클린 아키텍처
- Spring Boot Tutorial
- Spring Boot
- Spring Boot JPA
- 스프링 부트
- r
- spring boot jwt
- 함께 자라기
- 헥사고날 아키텍처
- JSON
- 스프링 데이터 jpa
- QueryDSL
- Linux
- intellij
- leetcode
- 알고리즘
- JPA
- proto3
- 스프링 부트 튜토리얼
- 스프링 부트 회원 가입
- 함께 자라기 후기
- 스프링 부트 애플리케이션
- Spring Data JPA
| 일 | 월 | 화 | 수 | 목 | 금 | 토 |
|---|---|---|---|---|---|---|
| 1 | 2 | 3 | 4 | |||
| 5 | 6 | 7 | 8 | 9 | 10 | 11 |
| 12 | 13 | 14 | 15 | 16 | 17 | 18 |
| 19 | 20 | 21 | 22 | 23 | 24 | 25 |
| 26 | 27 | 28 | 29 | 30 | 31 |