
티스토리 뷰
본 포스팅은 정은구님의 Spring Boot JWT Tutorial 강의를 참고하여 작성하였습니다.
인프런 내에서도 무료 강의이니 시간 되시는 분은 시청하시는 것을 추천드립니다.
소스 코드는 여기 있습니다. (commit hash: fb492f5)> git clone https://github.com/lcalmsky/jwt-tutorial.git > git checkout fb492f5
Overview
Security 설정, DataSource 및 JPA 설정, Entity 생성, H2 Console 결과 확인
Security 설정
먼저 /api/hello로 인증 없이 접근할 수 있게, 나머지 API에 대해서는 인증을 해야만 접근할 수 있게 설정을 추가해주겠습니다.
/src/main/java/io/lcalmsky/jwttutorial/config/SecurityConfig.java
package io.lcalmsky.jwttutorial.config;

import org.springframework.security.config.annotation.web.builders.HttpSecurity;
import org.springframework.security.config.annotation.web.configuration.EnableWebSecurity;
import org.springframework.security.config.annotation.web.configuration.WebSecurityConfigurerAdapter;

@EnableWebSecurity // (1)
public class SecurityConfig extends WebSecurityConfigurerAdapter { // (2)

  @Override
  protected void configure(HttpSecurity http) throws Exception { // (3)
    http
        .authorizeRequests()
        .antMatchers("/api/hello").permitAll() // (4)
        .anyRequest().authenticated(); // (5)
  }
}
- 기본적인 Web 보안을 활성화합니다.
- 설정을 커스터마이즈하기 위해 WebSecurityConfigurerAdapter를 extends 합니다.
- httpSecurity를 수정할 수 있게 configure 메서드를 오버라이드 합니다.
- "/api/hello"에는 모두가 접근할 수 있게 합니다.
- 나머지 모든 요청에 대해서는 인증된 사용자만 접근할 수 있게 합니다.
이전 포스팅에서처럼 앱을 실행 후 http://localhost:8080/api/hello 여기 접속했을 때 로그인 없이 바로 접근되면 성공입니다.
application.yml
다음은 설정파일을 수정합니다.
/src/main/resources/application.yml
spring:
  h2:
    console:
      enabled: true # (1)
  datasource:
    url: jdbc:h2:mem:testdb # (2)
    driver-class-name: org.h2.Driver # (3)
    username: sa
    password:
  jpa:
    database-platform: org.hibernate.dialect.H2Dialect
    hibernate:
      ddl-auto: create-drop # (4)
    properties:
      hibernate:
        format_sql: true # (5)
        show_sql: true # (5)
logging:
  level:
io.lcalmsky: debug # (5)- h2 데이터베이스를 웹 콘솔로 볼 수 있게 해줍니다. (기본설정)
- 메모리 DB를 사용합니다. (기본설정)
- DB 접속시 사용할 드라이버를 지정합니다. dependency에 h2를 추가하면 모두 기분설정입니다.
- 애플리케이션이 시작될 때 drop, create, alter가 발생하고 종료될 때 다시 drop됩니다.
- 로그를 보기 위한 설정입니다.
Entity 생성
사용자와 권한에 관련된 Entity를 생성합니다.
/src/main/java/io/lcalmsky/jwttutorial/domain/entity/User.java
package io.lcalmsky.jwttutorial.domain.entity;

import com.fasterxml.jackson.annotation.JsonIgnore;
import java.util.Set;
import javax.persistence.Column;
import javax.persistence.Entity;
import javax.persistence.GeneratedValue;
import javax.persistence.Id;
import javax.persistence.JoinColumn;
import javax.persistence.JoinTable;
import javax.persistence.ManyToMany;
import javax.persistence.Table;
import lombok.AccessLevel;
import lombok.Getter;
import lombok.NoArgsConstructor;
import lombok.ToString;
import lombok.ToString.Exclude;

@Entity
@Getter
@Table(name = "user")
@NoArgsConstructor(access = AccessLevel.PROTECTED)
@ToString
public class User {

  @JsonIgnore
  @Id
  @Column(name = "user_id")
  @GeneratedValue
  private Long id;
  @Column(length = 50, unique = true)
  private String username;
  @Column(length = 100)
  @JsonIgnore
  private String password;
  @Column(length = 50)
  private String nickname;
  @JsonIgnore
  private boolean activated;
  @ManyToMany
  @JoinTable(
      name = "user_authority",
      joinColumns = {
          @JoinColumn(name = "user_id", referencedColumnName = "user_id")
      },
      inverseJoinColumns = {
          @JoinColumn(name = "authority_name", referencedColumnName = "authority_name")
      }
  )
  @Exclude
  private Set<Authority> authorities;

  public void setAuthorities(Set<Authority> authorities) {
    this.authorities = authorities;
  }
}
/src/main/java/io/lcalmsky/jwttutorial/domain/entity/Authority.java
package io.lcalmsky.jwttutorial.domain.entity;

import javax.persistence.Column;
import javax.persistence.Entity;
import javax.persistence.Id;
import javax.persistence.Table;
import lombok.AccessLevel;
import lombok.Getter;
import lombok.NoArgsConstructor;
import lombok.ToString;

@Entity
@Table(name = "authority")
@Getter
@NoArgsConstructor(access = AccessLevel.PROTECTED)
@ToString
public class Authority {

  @Id
  @Column(name = "authority_name", length = 50)
  private String authorityName;
}
JPA를 다루는 포스팅이 아니므로 설명은 생략하겠습니다.
초기 데이터 생성
현재 설정이 ddl-auto: create-drop 으로 되어있으므로 애플리케이션을 실행할 때마다 데이터를 모두 지우게 되는데, 편의를 위해 데이터를 생성해두고 실행될 때마다 추가할 수 있도록 하겠습니다.
/src/main/resources/data.sql
INSERT INTO USER (USER_ID, USERNAME, PASSWORD, NICKNAME, ACTIVATED) VALUES (1, 'admin', '$2a$08$lDnHPz7eUkSi6ao14Twuau08mzhWrL4kyZGGU5xfiGALO/Vxd5DOi', 'admin', 1);
INSERT INTO USER (USER_ID, USERNAME, PASSWORD, NICKNAME, ACTIVATED) VALUES (2, 'user', '$2a$08$UkVvwpULis18S19S5pZFn.YHPZt3oaqHZnDwqbCW9pft6uFtkXKDC', 'user', 1);

INSERT INTO AUTHORITY (AUTHORITY_NAME) values ('ROLE_USER');
INSERT INTO AUTHORITY (AUTHORITY_NAME) values ('ROLE_ADMIN');

INSERT INTO USER_AUTHORITY (USER_ID, AUTHORITY_NAME) values (1, 'ROLE_USER');
INSERT INTO USER_AUTHORITY (USER_ID, AUTHORITY_NAME) values (1, 'ROLE_ADMIN');
INSERT INTO USER_AUTHORITY (USER_ID, AUTHORITY_NAME) values (2, 'ROLE_USER');
Security 설정 업데이트
테이블이 잘 생성되는지 확인하기 위해선 H2 Console 접근이 필요한데, 권한 없이 접근하기 위해선 설정 수정이 필요합니다.
/src/main/java/io/lcalmsky/jwttutorial/config/SecurityConfig.java
package io.lcalmsky.jwttutorial.config;

import org.springframework.security.config.annotation.web.builders.HttpSecurity;
import org.springframework.security.config.annotation.web.builders.WebSecurity;
import org.springframework.security.config.annotation.web.configuration.EnableWebSecurity;
import org.springframework.security.config.annotation.web.configuration.WebSecurityConfigurerAdapter;

@EnableWebSecurity
public class SecurityConfig extends WebSecurityConfigurerAdapter {

  @Override
  protected void configure(HttpSecurity http) throws Exception {
    http
        .authorizeRequests()
        .antMatchers("/api/hello").permitAll()
        .anyRequest().authenticated();
  }

  @Override
  public void configure(WebSecurity web) throws Exception {
    web
        .ignoring().antMatchers("/h2-console/**", "/favicon.ico"); // (1)
  }
}
(1) 웹에서 h2-console 하위 리소스에 권한 없이 접근할 수 있게 수정해줍니다.
테스트
여기까지 작성이 완료되었다면 애플리케이션을 실행해줍니다.
실행했을 때 아래와 같은 에러가 발생하시는 분들은 application.yml을 수정해줘야 합니다.
org.springframework.beans.factory.BeanCreationException: Error creating bean with name 'dataSourceScriptDatabaseInitializer' defined in class path resource [org/springframework/boot/autoconfigure/sql/init/DataSourceInitializationConfiguration.class]: Invocation of init method failed; nested exception is org.springframework.jdbc.datasource.init.ScriptStatementFailedException: Failed to execute SQL script statement #1 of URL [file:/Users/jaime/git-repo/spring-boot-jwt-tutorial/build/resources/main/data.sql]: INSERT INTO USER (USER_ID, USERNAME, PASSWORD, NICKNAME, ACTIVATED) VALUES (1, 'admin', '$2a$08$lDnHPz7eUkSi6ao14Twuau08mzhWrL4kyZGGU5xfiGALO/Vxd5DOi', 'admin', 1); nested exception is org.h2.jdbc.JdbcSQLSyntaxErrorException: Table "USER" not found; SQL statement:
INSERT INTO USER (USER_ID, USERNAME, PASSWORD, NICKNAME, ACTIVATED) VALUES (1, 'admin', '$2a$08$lDnHPz7eUkSi6ao14Twuau08mzhWrL4kyZGGU5xfiGALO/Vxd5DOi', 'admin', 1) [42102-200]
... 생략
at io.lcalmsky.jwttutorial.JwtTutorialApplication.main(JwtTutorialApplication.java:10) ~[main/:na]
Caused by: org.springframework.jdbc.datasource.init.ScriptStatementFailedException: Failed to execute SQL script statement #1 of URL [file:/Users/jaime/git-repo/spring-boot-jwt-tutorial/build/resources/main/data.sql]: INSERT INTO USER (USER_ID, USERNAME, PASSWORD, NICKNAME, ACTIVATED) VALUES (1, 'admin', '$2a$08$lDnHPz7eUkSi6ao14Twuau08mzhWrL4kyZGGU5xfiGALO/Vxd5DOi', 'admin', 1); nested exception is org.h2.jdbc.JdbcSQLSyntaxErrorException: Table "USER" not found; SQL statement:
INSERT INTO USER (USER_ID, USERNAME, PASSWORD, NICKNAME, ACTIVATED) VALUES (1, 'admin', '$2a$08$lDnHPz7eUkSi6ao14Twuau08mzhWrL4kyZGGU5xfiGALO/Vxd5DOi', 'admin', 1) [42102-200]
... 생략
... 18 common frames omitted
Caused by: org.h2.jdbc.JdbcSQLSyntaxErrorException: Table "USER" not found; SQL statement:
INSERT INTO USER (USER_ID, USERNAME, PASSWORD, NICKNAME, ACTIVATED) VALUES (1, 'admin', '$2a$08$lDnHPz7eUkSi6ao14Twuau08mzhWrL4kyZGGU5xfiGALO/Vxd5DOi', 'admin', 1) [42102-200]
... 생략
... 28 common frames omitted
Spring Boot 2.5 버전부터 초기화 동작 과정을 Flyway, Liquibase와 일치시키기 위해 Hibernate 초기화 전에 data.sql을 실행한다고 하네요.
따라서 Entity가 먼저 초기화 된 뒤 sql문을 실행하기 위해서는 spring.jpa.defer-datasource-initialization: true 옵션을 추가해야 합니다.spring: h2: console: enabled: true datasource: url: jdbc:h2:mem:testdb driver-class-name: org.h2.Driver username: sa password: jpa: database-platform: org.hibernate.dialect.H2Dialect hibernate: ddl-auto: create-drop properties: hibernate: format_sql: true show_sql: true defer-datasource-initialization: true logging: level: io.lcalmsky: debug
실행 후 로그를 살펴보면 테이블이 정상적으로 생성된 것을 확인할 수 있습니다.
Hibernate:
drop table if exists authority CASCADE
Hibernate:
drop table if exists user CASCADE
Hibernate:
drop table if exists user_authority CASCADE
Hibernate:
drop sequence if exists hibernate_sequence
Hibernate: create sequence hibernate_sequence start with 1 increment by 1
Hibernate:
create table authority (
authority_name varchar(50) not null,
primary key (authority_name)
)
Hibernate:
create table user (
user_id bigint not null,
activated boolean not null,
nickname varchar(50),
password varchar(100),
username varchar(50),
primary key (user_id)
)
Hibernate:
create table user_authority (
user_id bigint not null,
authority_name varchar(50) not null,
primary key (user_id, authority_name)
)
Hibernate:
alter table user
add constraint UK_sb8bbouer5wak8vyiiy4pf2bx unique (username)
Hibernate:
alter table user_authority
add constraint FK6ktglpl5mjosa283rvken2py5
foreign key (authority_name)
references authority
Hibernate:
alter table user_authority
add constraint FKpqlsjpkybgos9w2svcri7j8xy
foreign key (user_id)
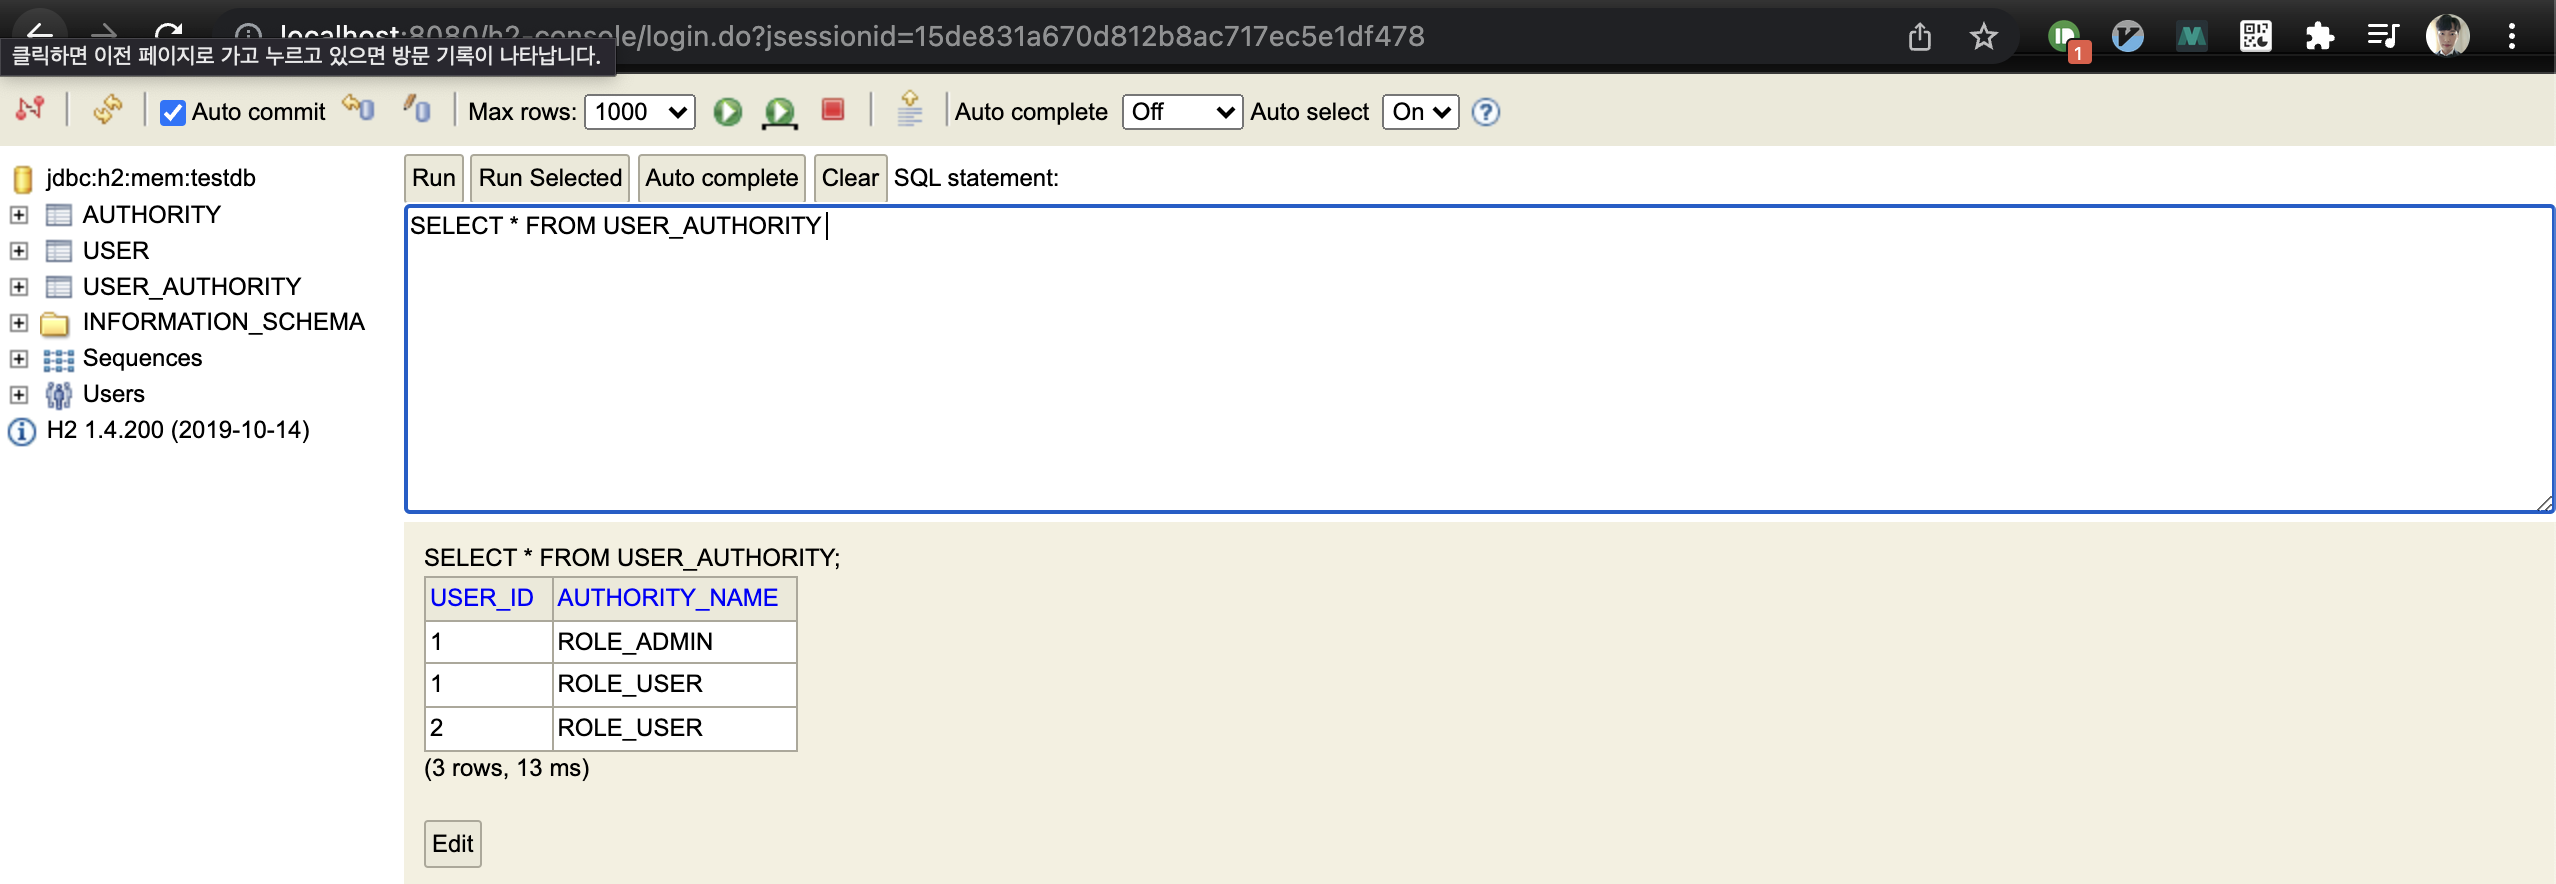
references user여기까지 완료되었다면 http://localhost:8080/h2-console 접속해 테이블이 잘 생성되고 데이터가 추가되었는지 확인합니다.
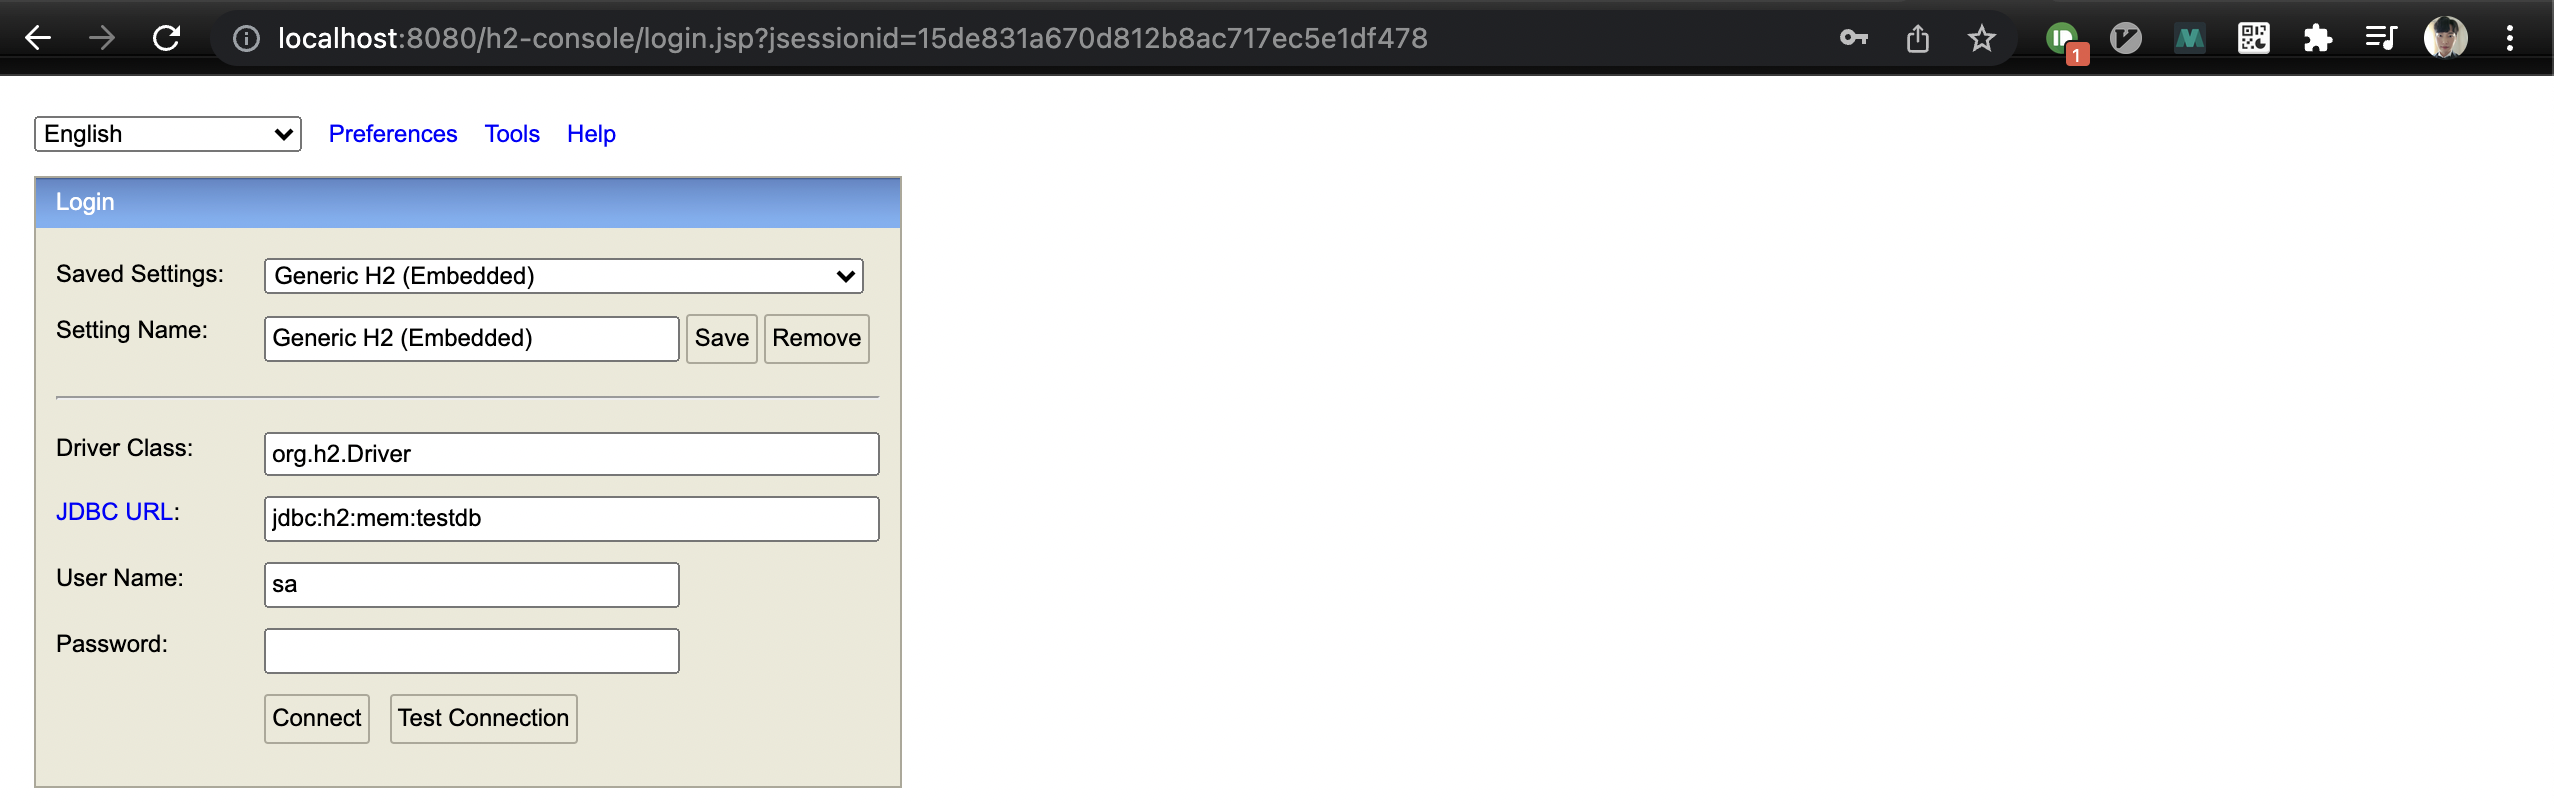
바로 connect 버틐을 클릭하면 접속됩니다.
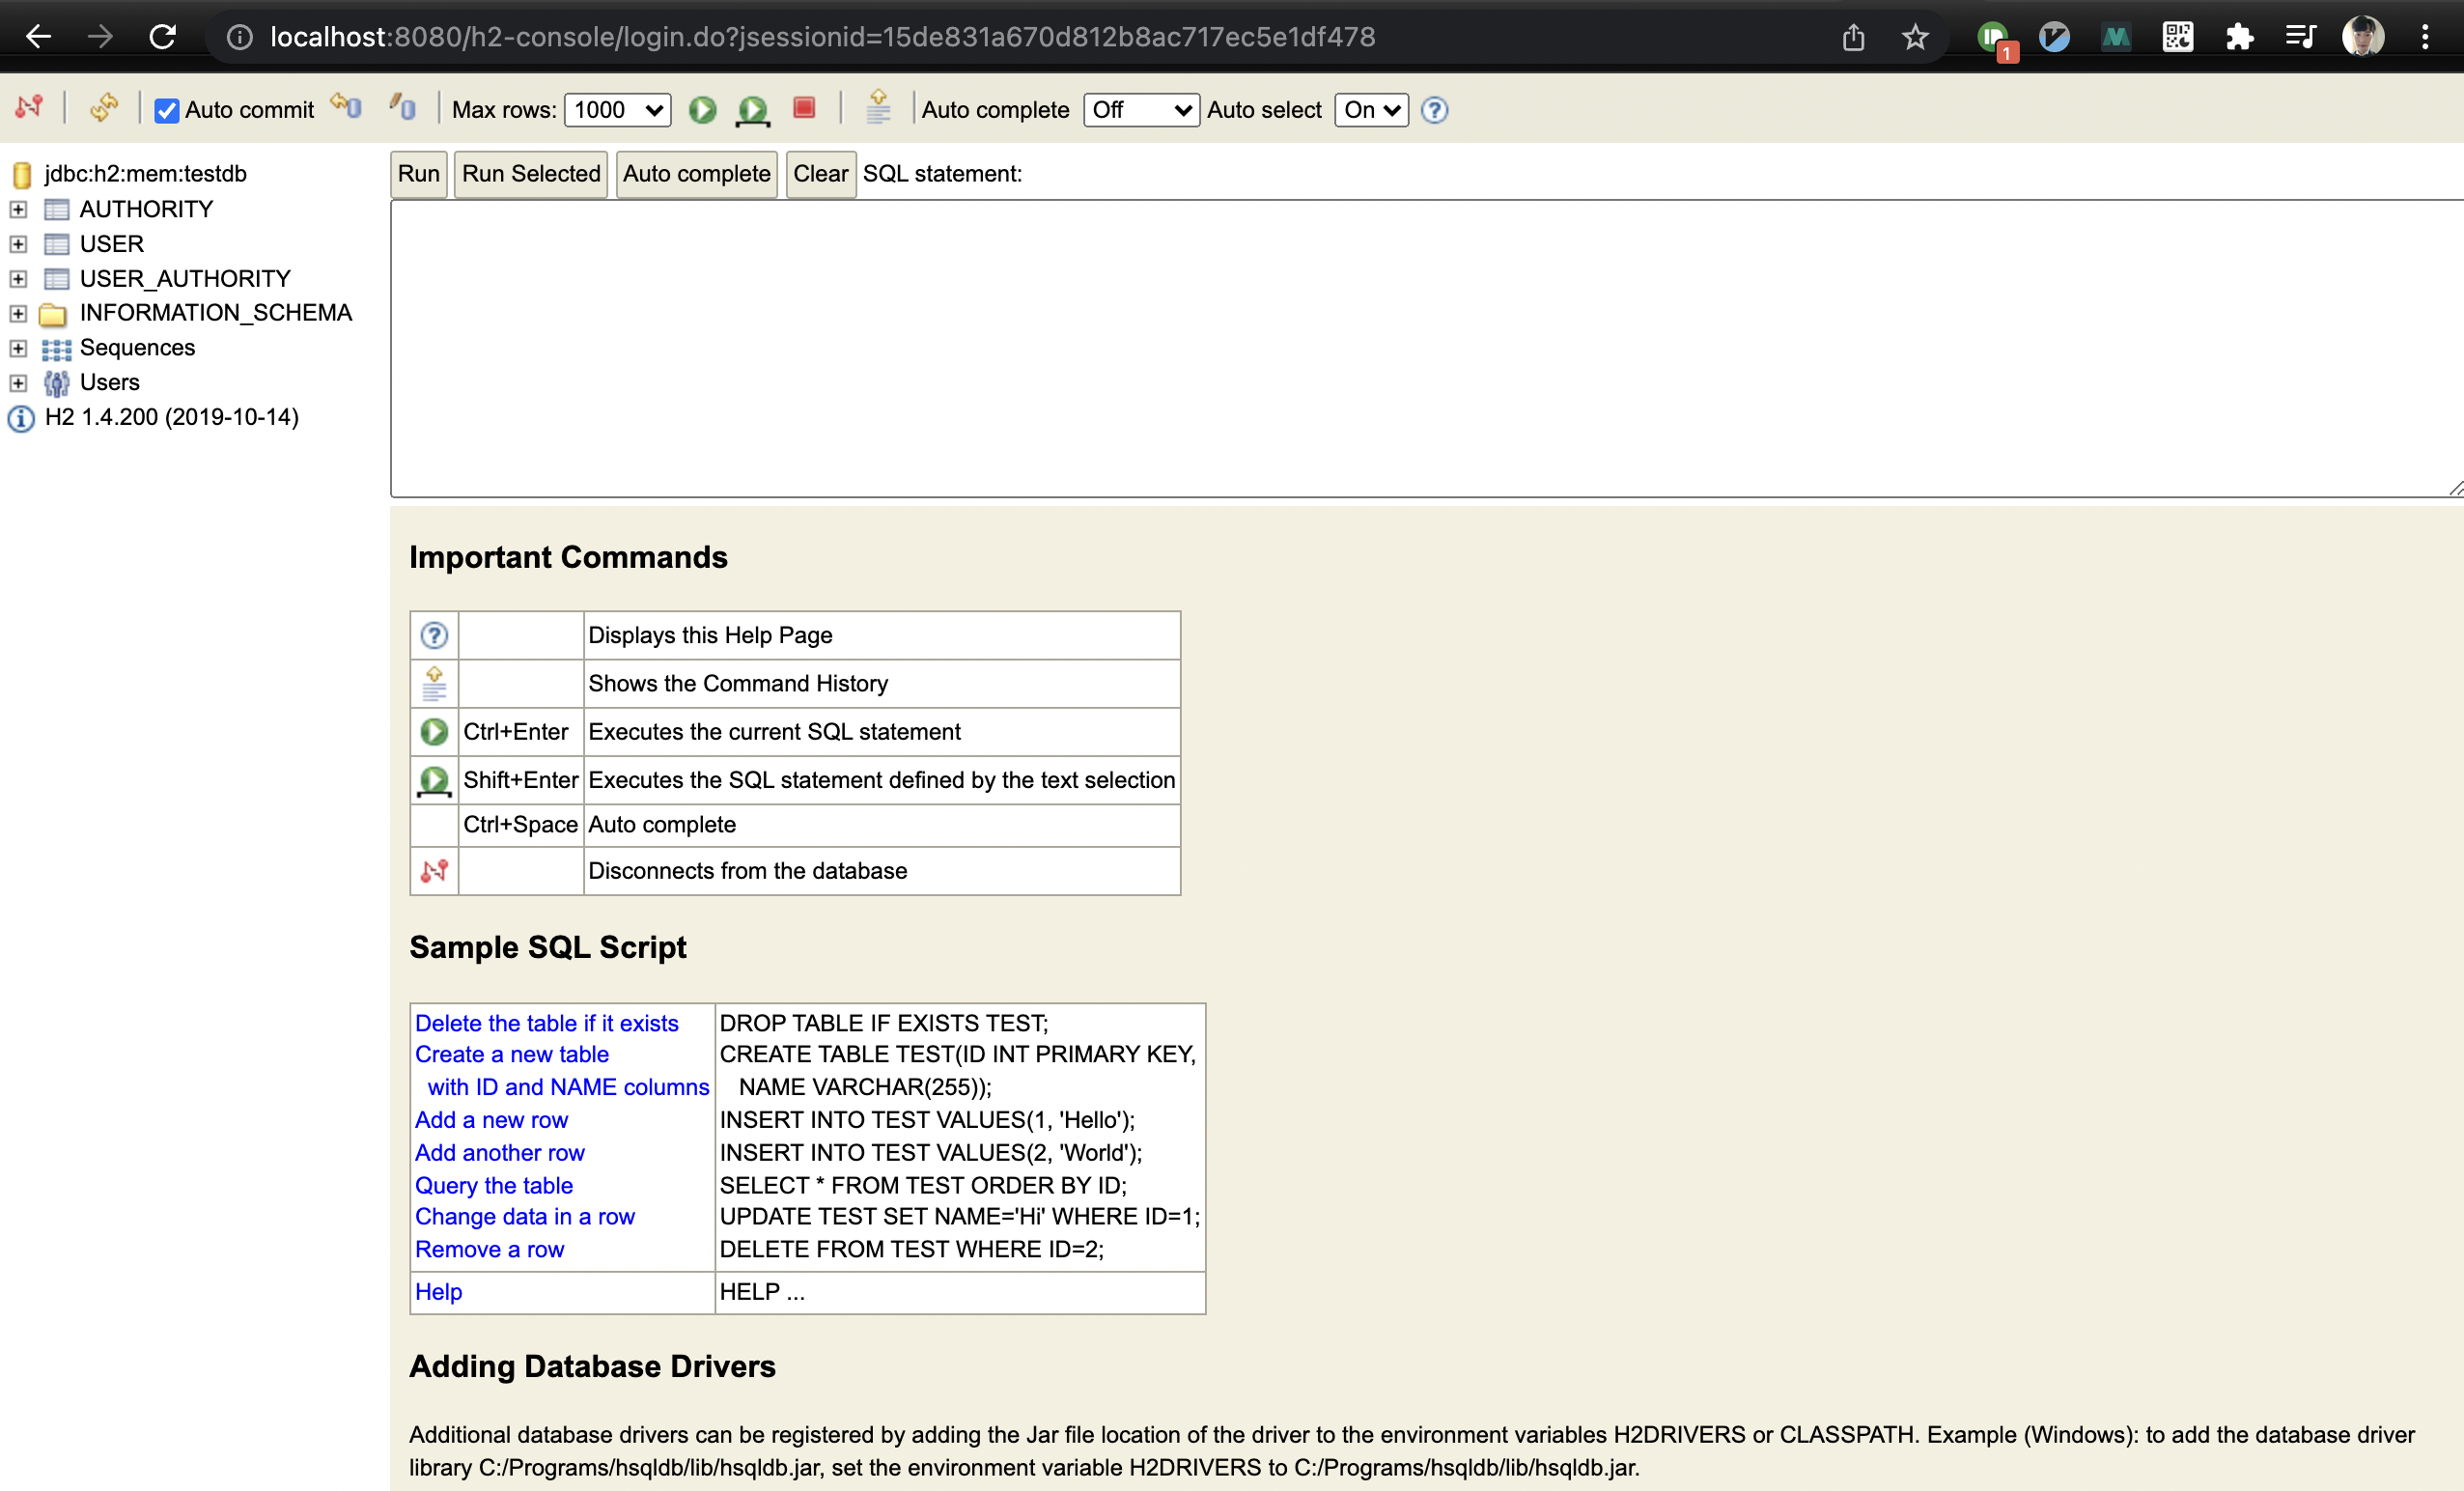
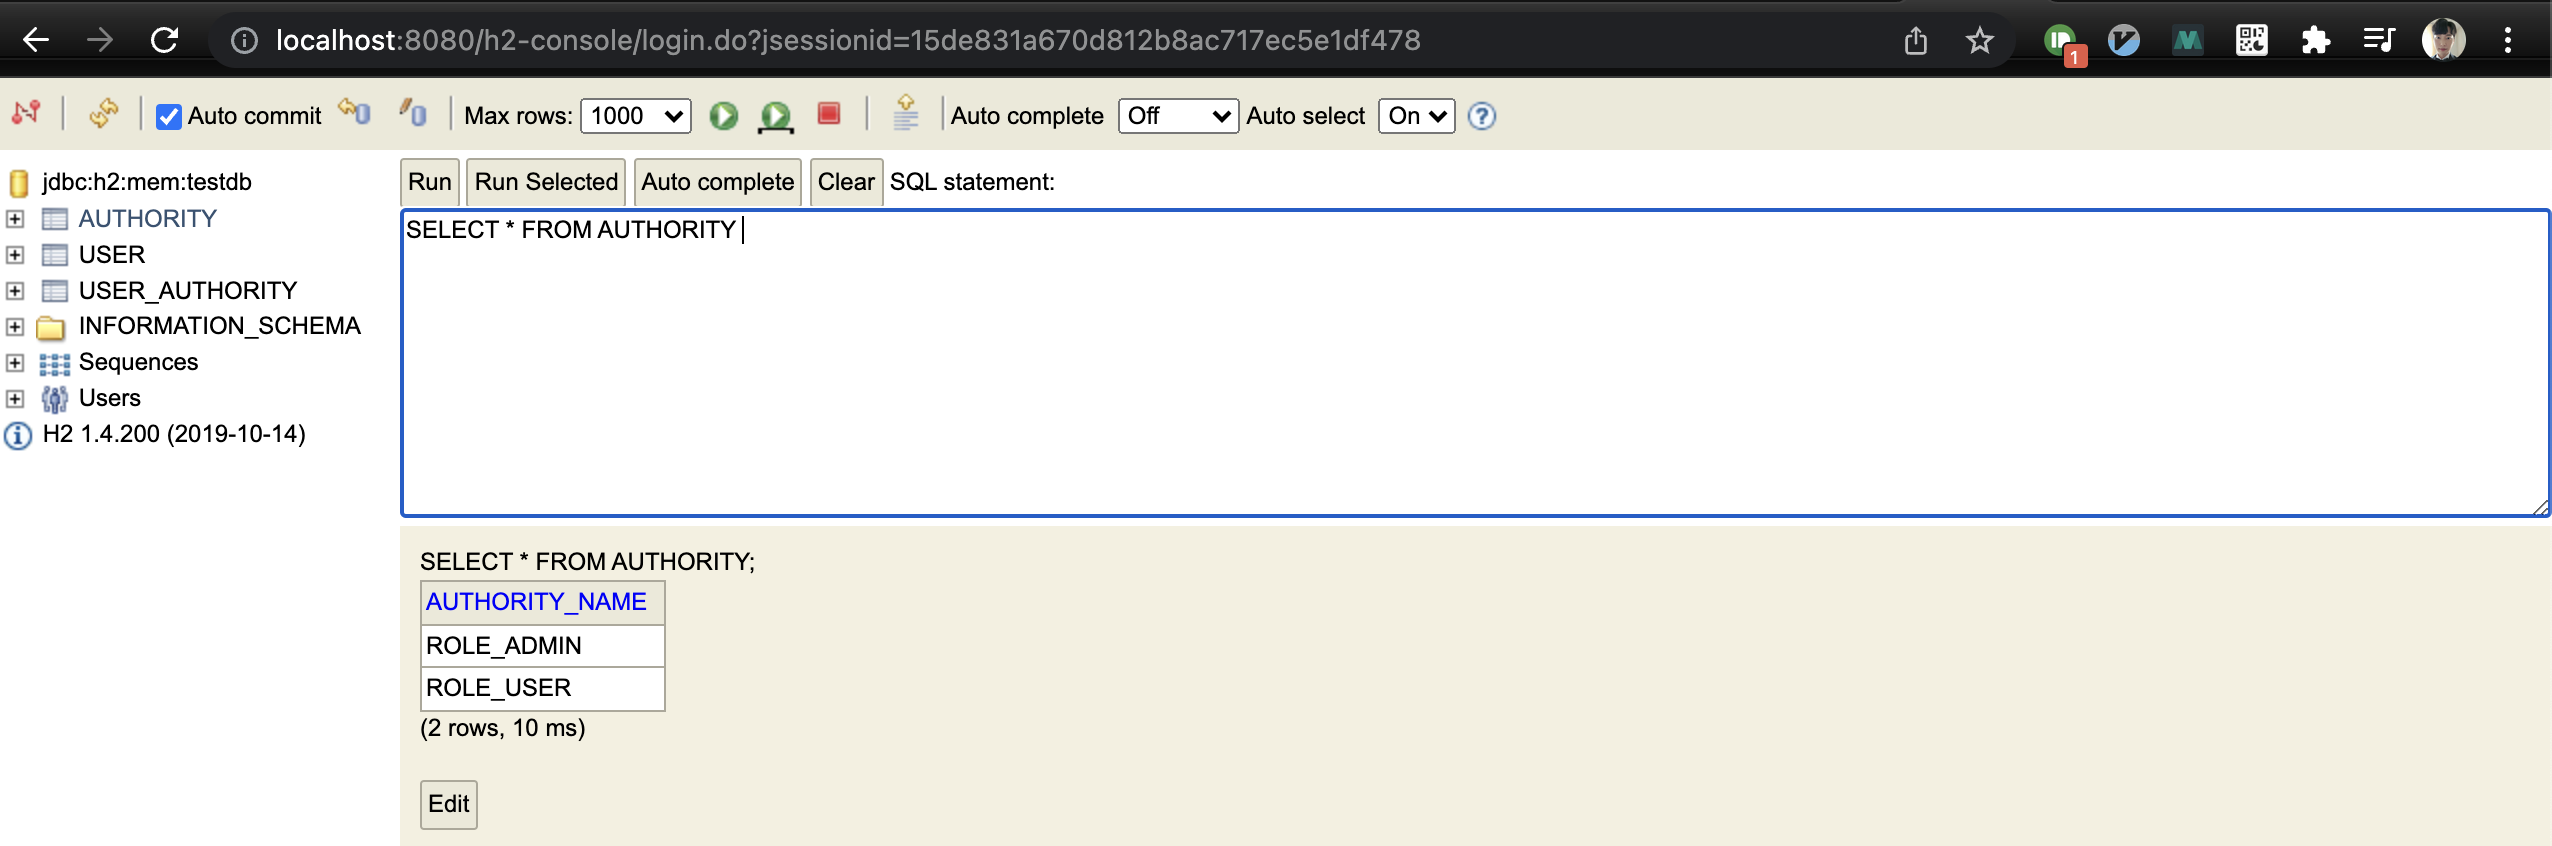
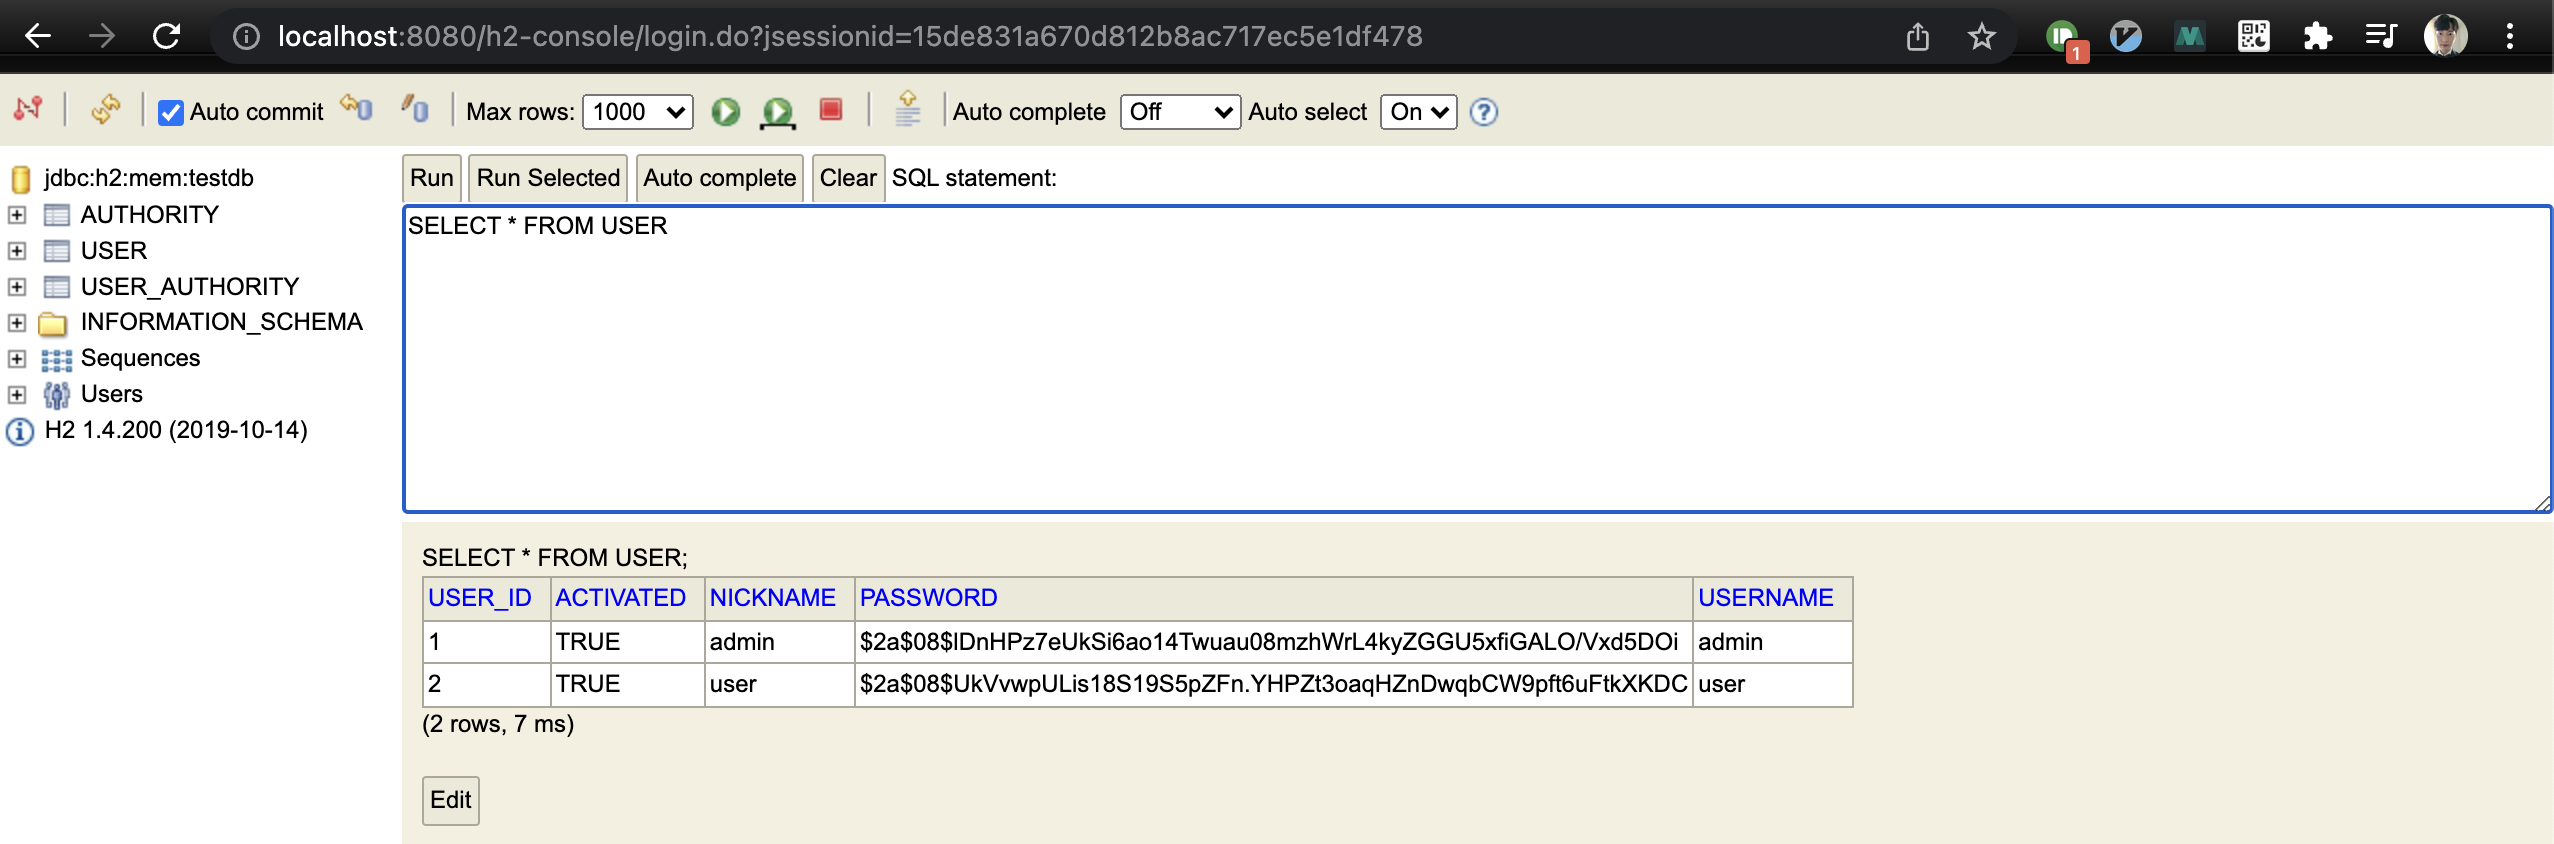
테이블이 잘 생성된 것을 확인했다면 안의 데이터도 확인해줍니다.
'SpringBoot > JWT 튜토리얼' 카테고리의 다른 글
| JWT 튜토리얼(5/5): 회원 가입 및 권한 검증 (0) | 2022.02.12 |
|---|---|
| JWT 튜토리얼 (4/5): 로그인 구현 및 테스트 (0) | 2022.02.11 |
| JWT 튜토리얼 (3/5): JWT 기능 구현 (0) | 2022.02.10 |
| JWT 튜토리얼 (1/5): JWT 소개 및 프로젝트 생성 (2) | 2022.02.08 |
- Total
- Today
- Yesterday
- Linux
- Spring Data JPA
- 클린 아키텍처
- 알고리즘
- Spring Boot
- leetcode
- spring boot application
- 스프링 부트 애플리케이션
- r
- Spring Boot JPA
- gRPC
- 함께 자라기 후기
- 스프링 데이터 jpa
- 스프링 부트 튜토리얼
- Jackson
- JPA
- 헥사고날 아키텍처
- proto3
- 스프링 부트 회원 가입
- 함께 자라기
- Java
- spring boot app
- QueryDSL
- JSON
- 스프링부트
- intellij
- spring boot jwt
- 스프링 부트
- Spring Boot Tutorial
- @ManyToOne
| 일 | 월 | 화 | 수 | 목 | 금 | 토 |
|---|---|---|---|---|---|---|
| 1 | 2 | 3 | 4 | 5 | 6 | 7 |
| 8 | 9 | 10 | 11 | 12 | 13 | 14 |
| 15 | 16 | 17 | 18 | 19 | 20 | 21 |
| 22 | 23 | 24 | 25 | 26 | 27 | 28 |