티스토리 뷰
스프링 부트 웹 애플리케이션 제작(9): 프론트엔드 라이브러리 및 빌드 설정
Jaime.Lee 2021. 10. 30. 10:30

본 포스팅은 백기선님의 스프링과 JPA 기반 웹 애플리케이션 개발 강의를 참고하여 작성하였습니다.
소스 코드는 여기 있습니다. (branch:feature/10)
Overview
스프링 부트에서 프론트엔드 라이브러리 설정하는 방법을 알아봅니다.
NPM (Node Package Manager)을 사용하여 dependency를 관리하고 package.json을 이용해 빌드합니다.
Front-end 라이브러리 설정
스프링 부트에서는 src/main/resources/static 디렉토리 하위 디렉토리들을 모두 정적 리소스로 제공합니다. (기본 설정이고 변경할 수 있습니다.)
즉, 어떤 툴을 이용해서든 해당 디렉토리 안에 리소스가 존재하도록 설정하게 되면 라이브러리를 이용할 수 있습니다.
리소스가 존재하게 하는 방법이 결국 build 이고, NPM과 package.json 파일을 이용해 리소스를 관리할 수 있습니다.
NPM 설치
macOS 기준 CLI를 이용해 설치하는 방법입니다.
먼저 아래 명령어를 입력해 NPM을 설치해줍니다.
> brew install node정상적으로 설치되었는지 확인하려면 아래 명령어를 수행합니다.
> node -v
v16.9.1
> npm -v
7.21.1
그리고 또 다른 패키지 매니저인 yarn을 설치해줍니다.
brew install yarn --ignore-dependencies버전이 정상적으로 출력되면 설치가 완료된 것입니다.
> yarn -v
1.22.11
package.json 파일 생성
src/main/resources/static로 이동해 아래 명령어를 수행합니다.
> cd src/main/resources/static
> npm init
This utility will walk you through creating a package.json file.
It only covers the most common items, and tries to guess sensible defaults.

See `npm help init` for definitive documentation on these fields
and exactly what they do.

Use `npm install <pkg>` afterwards to install a package and
save it as a dependency in the package.json file.

Press ^C at any time to quit.
package name: (static)
version: (1.0.0)
description:
entry point: (index.js)
test command:
git repository:
keywords:
author:
license: (ISC)
About to write to /Users/jaime/git-repo/spring-boot-app/src/main/resources/static/package.json:

{
  "name": "static",
  "version": "1.0.0",
  "description": "",
  "main": "index.js",
  "scripts": {
    "test": "echo \"Error: no test specified\" && exit 1"
  },
  "author": "",
  "license": "ISC"
}


Is this OK? (yes) yes
npm notice
npm notice New major version of npm available! 7.21.1 -> 8.1.2
npm notice Changelog: https://github.com/npm/cli/releases/tag/v8.1.2
npm notice Run npm install -g npm@8.1.2 to update!
npm notice
패키지명부터 license까지 직접 설정할 수 있습니다. 저는 계속 ⏎ 를 눌러 기본값으로 설정하였습니다.
bootstrap 설치
해당 경로에서 아래 명령어를 입력해 bootstrap을 설치합니다.
> npm install bootstrap

added 2 packages, and audited 3 packages in 2s

2 packages are looking for funding
  run `npm fund` for details

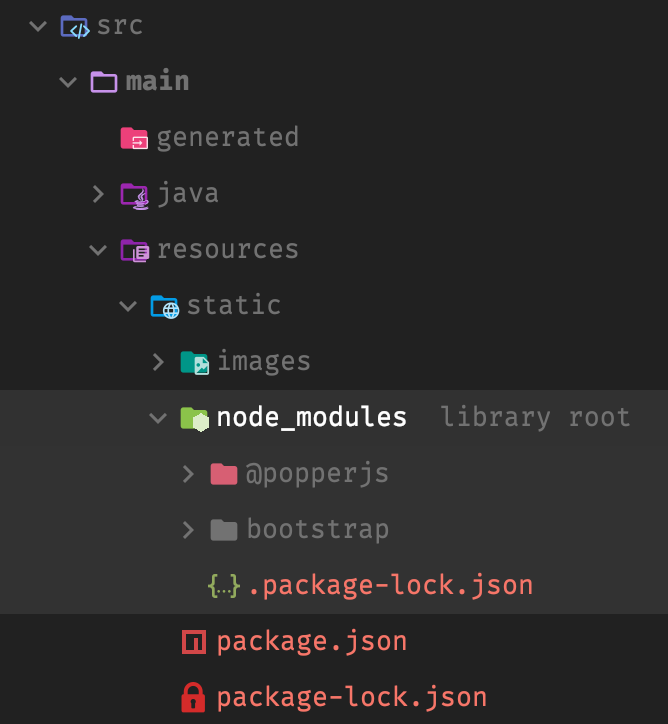
found 0 vulnerabilitiesnode_modules라는 디렉토리가 생성되고 하위에 bootstrap 디렉토리가 만들어졌습니다. 그리고 package.json 파일을 열어 보시면 dependency가 추가된 것을 확인할 수 있습니다.

{
  "name": "static",
  "version": "1.0.0",
  "description": "",
  "main": "index.js",
  "scripts": {
    "test": "echo \"Error: no test specified\" && exit 1"
  },
  "author": "",
  "license": "ISC",
  "dependencies": {
    "bootstrap": "^5.1.3"
  }
}
jQuery 설치
bootstrap 설치할 때와 마찬가지로 아래 명령어를 입력해 설치해줍니다.
> npm install jquery

added 1 package, and audited 4 packages in 423ms

2 packages are looking for funding
  run `npm fund` for details

found 0 vulnerabilities
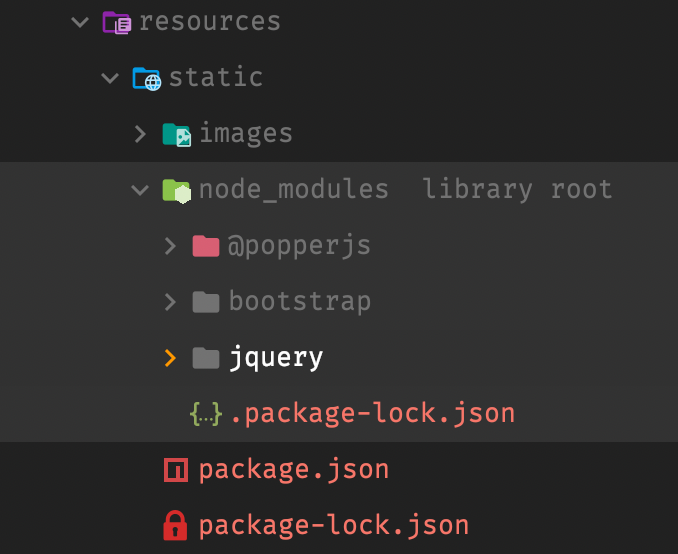
마찬가지로 jquery 디렉토리가 생성되었고 package.json 파일에 dependency가 추가되었습니다.

{
  "name": "static",
  "version": "1.0.0",
  "description": "",
  "main": "index.js",
  "scripts": {
    "test": "echo \"Error: no test specified\" && exit 1"
  },
  "author": "",
  "license": "ISC",
  "dependencies": {
    "bootstrap": "^5.1.3",
    "jquery": "^3.6.0"
  }
}
index.html 수정
기존에 직접 라이브러리들을 참조하는 방법에서 리소스 안에있는 라이브러리를 참조하도록 수정해줍니다.
<!DOCTYPE html>
<html lang="en"
      xmlns:th="http://www.thymeleaf.org"
      xmlns:sec="http://www.thymeleaf.org/extras/spring-security">
<head>
    <meta charset="UTF-8">
    <title>Webluxible</title>
    <link rel="stylesheet" href="/node_modules/bootstrap/dist/css/bootstrap.min.css">
    <!--생략-->
<script src="/node_modules/jquery/dist/jquery.min.js"></script>
<script src="/node_modules/bootstrap/dist/js/bootstrap.bundle.min.js"></script>
<!--생략-->
</body>
</html>
index.html 전체 보기
<!DOCTYPE html>
<html lang="en"
xmlns:th="http://www.thymeleaf.org"
xmlns:sec="http://www.thymeleaf.org/extras/spring-security">
<head>
<meta charset="UTF-8">
<title>Webluxible</title>
<link rel="stylesheet" href="/node_modules/bootstrap/dist/css/bootstrap.min.css">
<style>
.container {
max-width: 100%;
}
</style>
</head>
<body class="bg-light">
<nav class="navbar navbar-expand-sm navbar-dark bg-dark">
<a class="navbar-brand" href="/" th:href="@{/}">
<img src="/images/logo.png" width="30" height="30">
</a>
<button class="navbar-toggler" type="button" data-toggle="collapse" data-target="#navbarSupportedContent"
aria-controls="navbarSupportedContent" aria-expanded="false" aria-label="Toggle navigation">
<span class="navbar-toggler-icon"></span>
</button>
<div class="collapse navbar-collapse" id="navbarSupportedContent">
<ul class="navbar-nav mr-auto">
<li class="nav-item">
<form th:action="@{/search/study}" class="form-inline" method="get">
<input class="form-control mr-sm-2" name="keyword" type="search" placeholder="스터디 찾기"
aria-label="Search"/>
</form>
</li>
</ul>
<ul class="navbar-nav justify-content-end">
<li class="nav-item" sec:authorize="!isAuthenticated()">
<a class="nav-link" th:href="@{/login}">로그인</a>
</li>
<li class="nav-item" sec:authorize="!isAuthenticated()">
<a class="nav-link" th:href="@{/sign-up}">가입</a>
</li>
<li class="nav-item" sec:authorize="isAuthenticated()">
<a class="nav-link" th:href="@{/notifications}">알림</a>
</li>
<li class="nav-item" sec:authorize="isAuthenticated()">
<a class="nav-link btn btn-outline-primary" th:href="@{/notifications}">스터디 개설</a>
</li>
<li class="nav-item dropdown" sec:authorize="isAuthenticated()">
<a class="nav-link dropdown-toggle" href="#" id="userDropdown" role="button" data-toggle="dropdown"
aria-haspopup="true" aria-expanded="false">
프로필
</a>
<div class="dropdown-menu dropdown-menu-sm-right" aria-labelledby="userDropdown">
<h6 class="dropdown-header">
<span sec:authentication="name">Username</span>
</h6>
<a class="dropdown-item" th:href="@{'/profile/' + ${#authentication.name}}">프로필</a>
<a class="dropdown-item">스터디</a>
<div class="dropdown-divider"></div>
<a class="dropdown-item" href="#" th:href="@{'/settings/profile'}">설정</a>
<form class="form-inline my-2 my-lg-0" action="#" th:action="@{/logout}" method="post">
<button class="dropdown-item" type="submit">로그아웃</button>
</form>
</div>
</li>
</ul>
</div>
</nav>
<div class="container">
<div class="py-5 text-center">
<h2>Webluxible</h2>
</div>
<footer th:fragment="footer">
<div class="row justify-content-center">
<img class="mb-2" src="/images/logo.png" alt="" width="30">
<small class="d-block mb-3 text-muted">© 2021</small>
</div>
</footer>
</div>
<script src="/node_modules/jquery/dist/jquery.min.js"></script>
<script src="/node_modules/bootstrap/dist/js/bootstrap.bundle.min.js"></script>
<script type="application/javascript">
(function () {
}())
</script>
</body>
</html>.gitignore 수정
자동으로 받아오는 라이브러리들을 제외시키기 위해 .gitignore 파일에 해당 경로를 추가해줍니다.
> echo "src/main/resources/static/node_modules" >> .gitignore직접 파일을 열어서 해당 내용을 추가하셔도 됩니다.
CLI로 추가하실 경우 프로젝트 루트 경로로 이동 후 명령어를 수행하셔야 합니다.
Build 설정
node_modules 디렉토리를 제외시켰으므로 git에 라이브러리가 따로 push 되지 않습니다.
따라서 build 시점에 npm install을 실행할 수 있게 해줘야 합니다.
build.gradle을 아래와 같이 수정합니다.
plugins {
    id 'org.springframework.boot' version '2.5.4'
    id 'io.spring.dependency-management' version '1.0.11.RELEASE'
    id 'java'
    id 'com.github.node-gradle.node' version '2.2.3' // (1)
}

// 생략

// (2)
node {
    version = '16.9.1'
    download = true
    nodeModulesDir = file("${projectDir}/src/main/resources/static")
}

task copyFrontLib(type: Copy) {
    from "${projectDir}/src/main/resources/static"
    into "${projectDir}/build/resources/main/static/."
}

copyFrontLib.dependsOn npmInstall
compileJava.dependsOn copyFrontLibnode를gradle로 관리할 수 있는 플러그인을 추가합니다.npm install을 실행시켜주고 실행한 결과물을 복사하는 스크립트를 추가합니다.
build.gradle 전체 보기
plugins {
    id 'org.springframework.boot' version '2.5.4'
    id 'io.spring.dependency-management' version '1.0.11.RELEASE'
    id 'java'
    id 'com.github.node-gradle.node' version '2.2.3'
}

group = 'io.lcalmsky'
version = '0.0.1-SNAPSHOT'
sourceCompatibility = '11'

configurations {
    compileOnly {
        extendsFrom annotationProcessor
    }
}

repositories {
    mavenCentral()
}

dependencies {
    // spring
    implementation 'org.springframework.boot:spring-boot-starter-web'
    implementation 'org.springframework.boot:spring-boot-starter-security'
    implementation 'org.springframework.boot:spring-boot-starter-data-jpa'
    implementation 'org.springframework.boot:spring-boot-starter-actuator'
    implementation 'org.springframework.boot:spring-boot-starter-mail'
    implementation 'org.springframework.boot:spring-boot-starter-thymeleaf'
    implementation 'org.springframework.boot:spring-boot-starter-validation'
    implementation 'org.thymeleaf.extras:thymeleaf-extras-springsecurity5'
    // devtools
    compileOnly 'org.projectlombok:lombok'
    runtimeOnly 'org.springframework.boot:spring-boot-devtools'
    annotationProcessor 'org.springframework.boot:spring-boot-configuration-processor'
    annotationProcessor 'org.projectlombok:lombok'
    // db
    runtimeOnly 'com.h2database:h2'
    // test
    testImplementation 'org.springframework.boot:spring-boot-starter-test'
    testImplementation 'org.springframework.security:spring-security-test'
}

test {
    useJUnitPlatform()
}

node {
    version = '16.9.1'
    download = true
    nodeModulesDir = file("${projectDir}/src/main/resources/static")
}

task copyFrontLib(type: Copy) {
    from "${projectDir}/src/main/resources/static"
    into "${projectDir}/build/resources/main/static/."
}

copyFrontLib.dependsOn npmInstall
compileJava.dependsOn copyFrontLib
위 스크립트가 정상적으로 동작하는지 확인해보려면 기존 node_modules 디렉토리를 삭제하고 gradle build를 이용해 다시 생성되는지 확인하면 됩니다.
> Task :nodeSetup
> Task :npmSetup SKIPPED

> Task :npmInstall

added 3 packages, and audited 4 packages in 614ms

2 packages are looking for funding
  run `npm fund` for details

found 0 vulnerabilities

> Task :copyFrontLib
> Task :compileJava

// 생략
Security 설정 수정
위에까지만 설정하고 앱을 실행시키면 리소스들이 모두 깨져있는 것을 확인할 수 있습니다.
security 설정에서 해당 경로를 접근할 수 있게 수정해줘야하기 때문인데요, 아래 처럼 수정해줍니다.
package io.lcalmsky.app.config;

import org.springframework.boot.autoconfigure.security.servlet.PathRequest;
import org.springframework.context.annotation.Bean;
import org.springframework.context.annotation.Configuration;
import org.springframework.http.HttpMethod;
import org.springframework.security.config.annotation.web.builders.HttpSecurity;
import org.springframework.security.config.annotation.web.builders.WebSecurity;
import org.springframework.security.config.annotation.web.configuration.EnableWebSecurity;
import org.springframework.security.config.annotation.web.configuration.WebSecurityConfigurerAdapter;
import org.springframework.security.crypto.factory.PasswordEncoderFactories;
import org.springframework.security.crypto.password.PasswordEncoder;

@Configuration
@EnableWebSecurity
public class SecurityConfig extends WebSecurityConfigurerAdapter {
    @Override
    protected void configure(HttpSecurity http) throws Exception {
        http.authorizeRequests()
                .mvcMatchers("/", "/login", "/sign-up", "/check-email", "/check-email-token",
                        "/email-login", "/check-email-login", "/login-link").permitAll()
                .mvcMatchers(HttpMethod.GET, "/profile/*").permitAll()
                .anyRequest().authenticated();
    }

    @Override
    public void configure(WebSecurity web) throws Exception {
        web.ignoring()
                .requestMatchers(PathRequest.toStaticResources().atCommonLocations())
                .mvcMatchers("/node_modules/**", "/images/**")
                .antMatchers("/h2-console/**");
    }

    @Bean
    public PasswordEncoder passwordEncoder() {
        return PasswordEncoderFactories.createDelegatingPasswordEncoder();
    }
}
이제 앱을 다시 실행시켜보면 정상적으로 실행되는 것을 확인할 수 있습니다.
다음 포스팅에서는 View에 사용된 중복 코드를 제거하겠습니다.
'SpringBoot > Web Application 만들기' 카테고리의 다른 글
| 스프링 부트 웹 애플리케이션 제작(11): 아이콘 추가 및 프로필 아바타 설정 (0) | 2021.12.03 |
|---|---|
| 스프링 부트 웹 애플리케이션 제작(10): View 중복 코드 제거(feat. fragment) (0) | 2021.11.25 |
| 스프링 부트 웹 애플리케이션 제작(8): 회원 가입 후 자동 로그인 처리 (0) | 2021.10.19 |
| 스프링 부트 웹 애플리케이션 제작(7): 이메일 인증 (6) | 2021.10.13 |
| 스프링 부트 웹 애플리케이션 제작(6): PasswordEncoder (0) | 2021.10.12 |
- Total
- Today
- Yesterday
- @ManyToOne
- spring boot jwt
- 스프링 부트 회원 가입
- 스프링 부트
- 헥사고날 아키텍처
- QueryDSL
- 함께 자라기
- JSON
- proto3
- 클린 아키텍처
- intellij
- Jackson
- r
- Spring Boot JPA
- JPA
- Java
- 스프링 부트 튜토리얼
- spring boot application
- spring boot app
- 함께 자라기 후기
- 알고리즘
- 스프링부트
- Spring Boot
- Spring Data JPA
- 스프링 데이터 jpa
- 스프링 부트 애플리케이션
- leetcode
- Spring Boot Tutorial
- Linux
- gRPC
| 일 | 월 | 화 | 수 | 목 | 금 | 토 |
|---|---|---|---|---|---|---|
| 1 | 2 | 3 | 4 | 5 | 6 | 7 |
| 8 | 9 | 10 | 11 | 12 | 13 | 14 |
| 15 | 16 | 17 | 18 | 19 | 20 | 21 |
| 22 | 23 | 24 | 25 | 26 | 27 | 28 |

