
티스토리 뷰
본 포스팅은 백기선님의 스프링과 JPA 기반 웹 애플리케이션 개발 강의를 참고하여 작성하였습니다.
소스 코드는 여기 있습니다. (commit hash: 927a89d)> git clone https://github.com/lcalmsky/spring-boot-app.git > git checkout 927a89dℹ️ squash merge를 사용해 기존 branch를 삭제하기로 하여 앞으로는 commit hash로 포스팅 시점의 소스 코드를 공유할 예정입니다.
Overview
스터디 개설 기능을 구현합니다.
엔드포인트 추가
스터디 관련 기능을 제어할 엔드포인트를 생성합니다.
/src/main/java/io/lcalmsky/app/study/endpoint/StudyController.java
package io.lcalmsky.app.study.endpoint;

import io.lcalmsky.app.account.domain.entity.Account;
import io.lcalmsky.app.account.support.CurrentUser;
import io.lcalmsky.app.study.application.StudyService;
import io.lcalmsky.app.study.domain.entity.Study;
import io.lcalmsky.app.study.form.StudyForm;
import io.lcalmsky.app.study.form.validator.StudyFormValidator;
import lombok.RequiredArgsConstructor;
import org.springframework.stereotype.Controller;
import org.springframework.ui.Model;
import org.springframework.validation.Errors;
import org.springframework.web.bind.WebDataBinder;
import org.springframework.web.bind.annotation.GetMapping;
import org.springframework.web.bind.annotation.InitBinder;
import org.springframework.web.bind.annotation.PostMapping;

import javax.validation.Valid;
import java.net.URLEncoder;
import java.nio.charset.StandardCharsets;

@Controller
@RequiredArgsConstructor
public class StudyController {
    // (1)
    private final StudyService studyService;
    private final StudyFormValidator studyFormValidator;

    // (2)
    @InitBinder("studyForm")
    public void studyFormInitBinder(WebDataBinder webDataBinder) {
        webDataBinder.addValidators(studyFormValidator);
    }

    // (3)
    @GetMapping("/new-study")
    public String newStudyForm(@CurrentUser Account account, Model model) {
        model.addAttribute(account);
        model.addAttribute(new StudyForm());
        return "study/form";
    }

    // (4)
    @PostMapping("/new-study")
    public String newStudySubmit(@CurrentUser Account account, @Valid StudyForm studyForm, Errors errors) {
        if (errors.hasErrors()) {
            return "study/form";
        }
        Study newStudy = studyService.createNewStudy(studyForm, account);
        return "redirect:/study/" + URLEncoder.encode(newStudy.getPath(), StandardCharsets.UTF_8);
    }
}- 스터디 정보를 다룰
StudyService와 스터디 폼을 검증할StudyFormValidator를 주입받습니다. 현재 구현되어있지 않으므로 컴파일 에러가 발생합니다. StudyForm을 검증할StudyFormValidator를WebDataBinder를 이용해 추가해줍니다.- 스터디 개설 버튼을 눌렀을 때 스터디 생성 페이지로 이동시켜 줍니다. 현재 계정 정보와
StudyForm을 넘겨줍니다. - 스터디 생성 버튼을 눌렀을 때 에러가 있을 경우 에러를 전달하고, 에러가 없을 경우 스터디 생성 후 생성된 스터디 페이지로 이동합니다.
서비스 추가
스터디 관련 작업을 위해 StudyService를 생성합니다.
/src/main/java/io/lcalmsky/app/study/application/StudyService.java
package io.lcalmsky.app.study.application;

import io.lcalmsky.app.account.domain.entity.Account;
import io.lcalmsky.app.study.domain.entity.Study;
import io.lcalmsky.app.study.form.StudyForm;
import io.lcalmsky.app.study.infra.repository.StudyRepository;
import lombok.RequiredArgsConstructor;
import org.springframework.stereotype.Service;
import org.springframework.transaction.annotation.Transactional;

@Service
@RequiredArgsConstructor
@Transactional
public class StudyService {
    // (1)
    private final StudyRepository studyRepository;

    // (2)
    public Study createNewStudy(StudyForm studyForm, Account account) {
        Study study = Study.from(studyForm);
        study.addManager(account);
        return studyRepository.save(study);
    }
}- CRUD 작업을 위해
StudyRepository를 주입받습니다. 현재 구현되지 않았으므로 컴파일 에러가 발생합니다. - StudyForm과 현재 로그인중인 Account 정보를 전달받아 Study를 생성합니다. Study 생성 후에는 생성한 계정을 관리자로 등록해주고 DB에 저장합니다.
Entity 수정
지난 포스팅에서 생성한 Study Entity를 수정합니다.
/src/main/java/io/lcalmsky/app/study/domain/entity/Study.java
// 생략
public class Study {
    // 생략
    @ManyToMany
    private Set<Account> managers = new HashSet<>();
    // 생략
    @ManyToMany
    private Set<Account> members = new HashSet<>();
    // 생략
    @ManyToMany
    private Set<Tag> tags = new HashSet<>();
    // 생략
    @ManyToMany
    private Set<Zone> zones = new HashSet<>();
    // 생략
    public static Study from(StudyForm studyForm) {
        Study study = new Study();
        study.title = studyForm.getTitle();
        study.shortDescription = studyForm.getShortDescription();
        study.fullDescription = studyForm.getFullDescription();
        study.path = studyForm.getPath();
        return study;
    }

    public void addManager(Account account) {
        managers.add(account);
    }
}
컬렉션 타입의 필드 변수를 바로 빈 객체로 초기화해주고, static 생성자와, 관리자 계정을 추가할 수 있는 메서드도 추가하였습니다.
Study.java 전체 보기
package io.lcalmsky.app.study.domain.entity;

import io.lcalmsky.app.account.domain.entity.Account;
import io.lcalmsky.app.account.domain.entity.Zone;
import io.lcalmsky.app.study.form.StudyForm;
import io.lcalmsky.app.tag.domain.entity.Tag;
import lombok.AccessLevel;
import lombok.Getter;
import lombok.NoArgsConstructor;

import javax.persistence.*;
import java.time.LocalDateTime;
import java.util.HashSet;
import java.util.Set;

@Entity
@NoArgsConstructor(access = AccessLevel.PROTECTED)
@Getter
public class Study {
    @Id
    @GeneratedValue
    private Long id;

    @ManyToMany
    private Set<Account> managers = new HashSet<>();

    @ManyToMany
    private Set<Account> members = new HashSet<>();

    @Column(unique = true)
    private String path;

    private String title;

    private String shortDescription;

    @Lob @Basic(fetch = FetchType.EAGER)
    private String fullDescription;

    @Lob @Basic(fetch = FetchType.EAGER)
    private String image;

    @ManyToMany
    private Set<Tag> tags = new HashSet<>();

    @ManyToMany
    private Set<Zone> zones = new HashSet<>();

    private LocalDateTime publishedDateTime;

    private LocalDateTime closedDateTime;

    private LocalDateTime recruitingUpdatedDateTime;

    private boolean recruiting;

    private boolean published;

    private boolean closed;

    private boolean useBanner;

    public static Study from(StudyForm studyForm) {
        Study study = new Study();
        study.title = studyForm.getTitle();
        study.shortDescription = studyForm.getShortDescription();
        study.fullDescription = studyForm.getFullDescription();
        study.path = studyForm.getPath();
        return study;
    }

    public void addManager(Account account) {
        managers.add(account);
    }
}
Repository 추가
Study Entity를 다룰 Repository를 생성합니다.
/src/main/java/io/lcalmsky/app/study/infra/repository/StudyRepository.java
package io.lcalmsky.app.study.infra.repository;

import io.lcalmsky.app.study.domain.entity.Study;
import org.springframework.data.jpa.repository.JpaRepository;
import org.springframework.transaction.annotation.Transactional;

@Transactional(readOnly = true)
public interface StudyRepository extends JpaRepository<Study, Long> {
    boolean existsByPath(String path);
}
path가 존재하는지 확인하는 메서드를 추가해주었습니다.
StudyForm 클래스 생성
스터디 정보를 전달받을 클래스를 생성합니다.
/src/main/java/io/lcalmsky/app/study/form/StudyForm.java
package io.lcalmsky.app.study.form;

import lombok.*;
import org.hibernate.validator.constraints.Length;

import javax.validation.constraints.NotBlank;
import javax.validation.constraints.Pattern;

@Data
@NoArgsConstructor
@AllArgsConstructor
@Builder
public class StudyForm {
    @NotBlank
    @Length(min = 2, max = 20)
    @Pattern(regexp = "^[ㄱ-ㅎ가-힣a-z0-9_-]{2,20}$")
    private String path;

    @NotBlank
    @Length(max = 50)
    private String title;

    @NotBlank
    @Length(max = 100)
    private String shortDescription;

    @NotBlank
    private String fullDescription;
}
@NotBlank, @Length, @Pattern을 이용해 validation을 추가하였습니다.
Validator 추가
위에서 생성한 StudyForm에서 검증할 수 없는 부분을 추가로 검증하기 위해 validator를 추가합니다.
/src/main/java/io/lcalmsky/app/study/form/validator/StudyFormValidator.java
package io.lcalmsky.app.study.form.validator;

import io.lcalmsky.app.study.form.StudyForm;
import io.lcalmsky.app.study.infra.repository.StudyRepository;
import lombok.RequiredArgsConstructor;
import org.springframework.stereotype.Component;
import org.springframework.validation.Errors;
import org.springframework.validation.Validator;

@Component
@RequiredArgsConstructor
public class StudyFormValidator implements Validator {
    private final StudyRepository studyRepository;

    @Override
    public boolean supports(Class<?> clazz) {
        return StudyForm.class.isAssignableFrom(clazz);
    }

    @Override
    public void validate(Object target, Errors errors) {
        StudyForm studyForm = (StudyForm) target;
        if (studyRepository.existsByPath(studyForm.getPath())) {
            errors.rejectValue("path", "wrong.path", "이미 사용중인 스터디 경로입니다.");
        }
    }
}
위에 Repository를 생성할 때 추가한 메서드를 여기서 기존 경로와 중복되는지 여부를 확인하기 위해 사용합니다.
라이브러리 설치
스터디 상세 정보를 적을 때 사용하기위한 위지윅(WYSIWYG) 에디터 라이브러리를 설치합니다.
저는 검색해서 나오는 아무 에디터나 사용하였습니다.
> cd src/main/resources/static
> npm install tinymce
fragments 수정
폰트 추가와 기존 경로의 오타를 수정합니다.
/src/main/resources/templates/fragments.html
<!DOCTYPE html>
<html lang="en"
      xmlns:th="http://www.thymeleaf.org"
      xmlns:sec="http://www.thymeleaf.org/extras/spring-security">
<head th:fragment="head">
    <meta charset="UTF-8">
    <title>Webluxible</title>
    <!-- font 추가-->
    <link rel="preconnect" href="https://fonts.googleapis.com">
    <link rel="preconnect" href="https://fonts.gstatic.com" crossorigin>
    <link href="https://fonts.googleapis.com/css2?family=Noto+Sans+KR:wght@300;400;500&display=swap" rel="stylesheet">
<!-- 생략-->
    <style>
        /*생략*/
        /*font 설정*/
        body {
            font-family: -apple-system, BlinkMacSystemFont, "Noto Sans KR", "Segoe UI", "Roboto Light", serif, Arial, "Noto Sans";
        }

        body,
        input,
        button,
        select,
        optgroup,
        textarea,
        .tooltip,
        .popover {
            font-family: -apple-system, BlinkMacSystemFont, "Noto Sans KR", "Segoe UI", "Roboto Light", serif, Arial, "Noto Sans";
        }
    </style>
</head>
<!-- 생략-->
<nav th:fragment="navigation-bar" class="navbar navbar-expand-sm navbar-dark bg-dark">
<!-- 생략-->
    <div class="collapse navbar-collapse" id="navbarSupportedContent">
<!-- 생략-->
        <ul class="navbar-nav justify-content-end">
<!-- 생략-->
            <li class="nav-item" sec:authorize="isAuthenticated()">
                <!-- 경로 오타 수정-->
                <a class="nav-link btn btn-outline-primary" th:href="@{/new-study}">
                    <i class="fa fa-plus" aria-hidden="true"></i> 스터디 개설 <!--"스터디 개설" 문자열 앞에 플러스 아이콘 추가-->
                </a>
            </li>
<!-- 생략-->
        </ul>
    </div>
</nav>
<!-- 생략-->
</html>
fragments.html 전체 보기
<!DOCTYPE html>
<html lang="en"
xmlns:th="http://www.thymeleaf.org"
xmlns:sec="http://www.thymeleaf.org/extras/spring-security">
<head th:fragment="head">
<meta charset="UTF-8">
<title>Webluxible</title>
<!-- font 추가-->
<link rel="preconnect" href="https://fonts.googleapis.com">
<link rel="preconnect" href="https://fonts.gstatic.com" crossorigin>
<link href="https://fonts.googleapis.com/css2?family=Noto+Sans+KR:wght@300;400;500&display=swap" rel="stylesheet">
<link rel="stylesheet" href="/node_modules/bootstrap/dist/css/bootstrap.min.css"/>
<link rel="stylesheet" href="/node_modules/font-awesome/css/font-awesome.min.css"/> <!--font-awesome 추가-->
<link rel="stylesheet" href="/node_modules/@yaireo/tagify/dist/tagify.css"/>
<script src="/node_modules/jdenticon/dist/jdenticon.min.js"></script> <!--jdenticon script 추가-->
<script src="/node_modules/jquery/dist/jquery.min.js"></script> <!--index.html에서 옮김-->
<script src="/node_modules/bootstrap/dist/js/bootstrap.bundle.min.js"></script> <!--index.html에서 옮김-->
<style>
.container {
max-width: 100%;
}
.tagify-outside {
border: 0;
padding: 0;
margin: 0;
}
/*font 설정*/
body {
font-family: -apple-system, BlinkMacSystemFont, "Noto Sans KR", "Segoe UI", "Roboto Light", serif, Arial, "Noto Sans";
}
body,
input,
button,
select,
optgroup,
textarea,
.tooltip,
.popover {
font-family: -apple-system, BlinkMacSystemFont, "Noto Sans KR", "Segoe UI", "Roboto Light", serif, Arial, "Noto Sans";
}
</style>
</head>
<footer th:fragment="footer">
<div class="row justify-content-center">
<small class="d-flex mb-3 text-muted" style="justify-content: center">Webluxible © 2021</small>
</div>
</footer>
<div th:fragment="settings-menu (currentMenu)" class="list-group">
<a class="list-group-item list-group-item-action" th:classappend="${currentMenu == 'profile'} ? active" href="#"
th:href="@{/settings/profile}">프로필</a>
<a class="list-group-item list-group-item-action" th:classappend="${currentMenu == 'password'} ? active" href="#"
th:href="@{/settings/password}">패스워드</a>
<a class="list-group-item list-group-item-action" th:classappend="${currentMenu == 'notification'} ? active"
href="#" th:href="@{/settings/notification}">알림 설정</a>
<a class="list-group-item list-group-item-action" th:classappend="${currentMenu == 'tags'} ? active" href="#"
th:href="@{/settings/tags}">관심 주제</a>
<a class="list-group-item list-group-item-action" th:classappend="${currentMenu == 'zones'} ? active" href="#"
th:href="@{/settings/zones}">활동 지역</a>
<a class="list-group-item list-group-item-action list-group-item-danger"
th:classappend="${currentMenu == 'account'}? active" href="#" th:href="@{/settings/account}">계정</a>
</div>
<nav th:fragment="navigation-bar" class="navbar navbar-expand-sm navbar-dark bg-dark">
<a class="navbar-brand" href="/" th:href="@{/}">
<img src="/images/logo.png" width="30" height="30">
</a>
<button class="navbar-toggler" type="button" data-bs-toggle="collapse" data-target="#navbarSupportedContent"
aria-controls="navbarSupportedContent" aria-expanded="false" aria-label="Toggle navigation">
<span class="navbar-toggler-icon"></span>
</button>
<div class="collapse navbar-collapse" id="navbarSupportedContent">
<ul class="navbar-nav mr-auto">
<li class="nav-item">
<form th:action="@{/search/study}" class="form-inline" method="get">
<input class="form-control mr-sm-2" name="keyword" type="search" placeholder="스터디 찾기"
aria-label="Search"/>
</form>
</li>
</ul>
<ul class="navbar-nav justify-content-end">
<li class="nav-item" sec:authorize="!isAuthenticated()">
<a class="nav-link" th:href="@{/login}">로그인</a>
</li>
<li class="nav-item" sec:authorize="!isAuthenticated()">
<a class="nav-link" th:href="@{/sign-up}">가입</a>
</li>
<li class="nav-item" sec:authorize="isAuthenticated()">
<a class="nav-link" th:href="@{/notifications}">
<i class="fa fa-bell-o" aria-hidden="true"></i> <!--"알림" 문자열을 종 모양 아이콘으로 수정-->
</a>
</li>
<li class="nav-item" sec:authorize="isAuthenticated()">
<!-- 경로 오타 수정-->
<a class="nav-link btn btn-outline-primary" th:href="@{/new-study}">
<i class="fa fa-plus" aria-hidden="true"></i> 스터디 개설 <!--"스터디 개설" 문자열 앞에 플러스 아이콘 추가-->
</a>
</li>
<li class="nav-item dropdown" sec:authorize="isAuthenticated()">
<a class="nav-link dropdown-toggle" href="#" id="userDropdown" role="button" data-bs-toggle="dropdown"
aria-haspopup="true" aria-expanded="false">
<!-- 이미지가 존재하면 이미지를, 그렇지 않으면 아바타를 보여주도록 수정(시작) -->
<svg th:if="${#strings.isEmpty(account?.profile?.image)}"
th:data-jdenticon-value="${#authentication.name}" width="24" height="24"
class="rounded border bg-light"></svg><!--"프로필" 대신 아바타 이미지를 보여줌-->
<img th:if="${!#strings.isEmpty(account?.profile?.image)}"
th:src="${account.profile.image}" width="24" height="24" class="rounded border"/>
<!-- 이미지가 존재하면 이미지를, 그렇지 않으면 아바타를 보여주도록 수정(끝) -->
</a>
<div class="dropdown-menu dropdown-menu-sm-right" aria-labelledby="userDropdown">
<h6 class="dropdown-header">
<span sec:authentication="name">Username</span>
</h6>
<a class="dropdown-item" th:href="@{'/profile/' + ${#authentication.name}}">프로필</a>
<a class="dropdown-item">스터디</a>
<div class="dropdown-divider"></div>
<a class="dropdown-item" href="#" th:href="@{'/settings/profile'}">설정</a>
<form class="form-inline my-2 my-lg-0" action="#" th:action="@{/logout}" method="post">
<button class="dropdown-item" type="submit">로그아웃</button>
</form>
</div>
</li>
</ul>
</div>
</nav>
<script type="application/javascript" th:fragment="form-validation">
(function () {
'use strict';
window.addEventListener('load', function () {
// Fetch all the forms we want to apply custom Bootstrap validation styles to
const forms = document.getElementsByClassName('needs-validation');
// Loop over them and prevent submission
Array.prototype.filter.call(forms, function (form) {
form.addEventListener('submit', function (event) {
if (form.checkValidity() === false) {
event.preventDefault();
event.stopPropagation();
}
form.classList.add('was-validated')
}, false)
})
}, false)
}())
</script>
<svg th:fragment="svg-symbols" xmlns="http://www.w3.org/2000/svg" style="display: none;">
<symbol id="info-fill" fill="currentColor" viewBox="0 0 16 16">
<path d="M8 16A8 8 0 1 0 8 0a8 8 0 0 0 0 16zm.93-9.412-1 4.705c-.07.34.029.533.304.533.194 0 .487-.07.686-.246l-.088.416c-.287.346-.92.598-1.465.598-.703 0-1.002-.422-.808-1.319l.738-3.468c.064-.293.006-.399-.287-.47l-.451-.081.082-.381 2.29-.287zM8 5.5a1 1 0 1 1 0-2 1 1 0 0 1 0 2z"/>
</symbol>
<symbol id="check-circle-fill" fill="currentColor" viewBox="0 0 16 16">
<path d="M16 8A8 8 0 1 1 0 8a8 8 0 0 1 16 0zm-3.97-3.03a.75.75 0 0 0-1.08.022L7.477 9.417 5.384 7.323a.75.75 0 0 0-1.06 1.06L6.97 11.03a.75.75 0 0 0 1.079-.02l3.992-4.99a.75.75 0 0 0-.01-1.05z"/>
</symbol>
<symbol id="exclamation-triangle-fill" fill="currentColor" viewBox="0 0 16 16">
<path d="M8.982 1.566a1.13 1.13 0 0 0-1.96 0L.165 13.233c-.457.778.091 1.767.98 1.767h13.713c.889 0 1.438-.99.98-1.767L8.982 1.566zM8 5c.535 0 .954.462.9.995l-.35 3.507a.552.552 0 0 1-1.1 0L7.1 5.995A.905.905 0 0 1 8 5zm.002 6a1 1 0 1 1 0 2 1 1 0 0 1 0-2z"/>
</symbol>
</svg>
<svg th:fragment="symbol-info" class="bi flex-shrink-0 me-2" width="24" height="24" role="img" aria-label="Info:">
<use xlink:href="#info-fill"/>
</svg>
<svg th:fragment="symbol-success" class="bi flex-shrink-0 me-2" width="24" height="24" role="img" aria-label="Success:">
<use xlink:href="#check-circle-fill"/>
</svg>
<svg th:fragment="symbol-warning" class="bi flex-shrink-0 me-2" width="24" height="24" role="img" aria-label="Warning:">
<use xlink:href="#exclamation-triangle-fill"/>
</svg>
<svg th:fragment="symbol-danger" class="bi flex-shrink-0 me-2" width="24" height="24" role="img" aria-label="Danger:">
<use xlink:href="#exclamation-triangle-fill"/>
</svg>
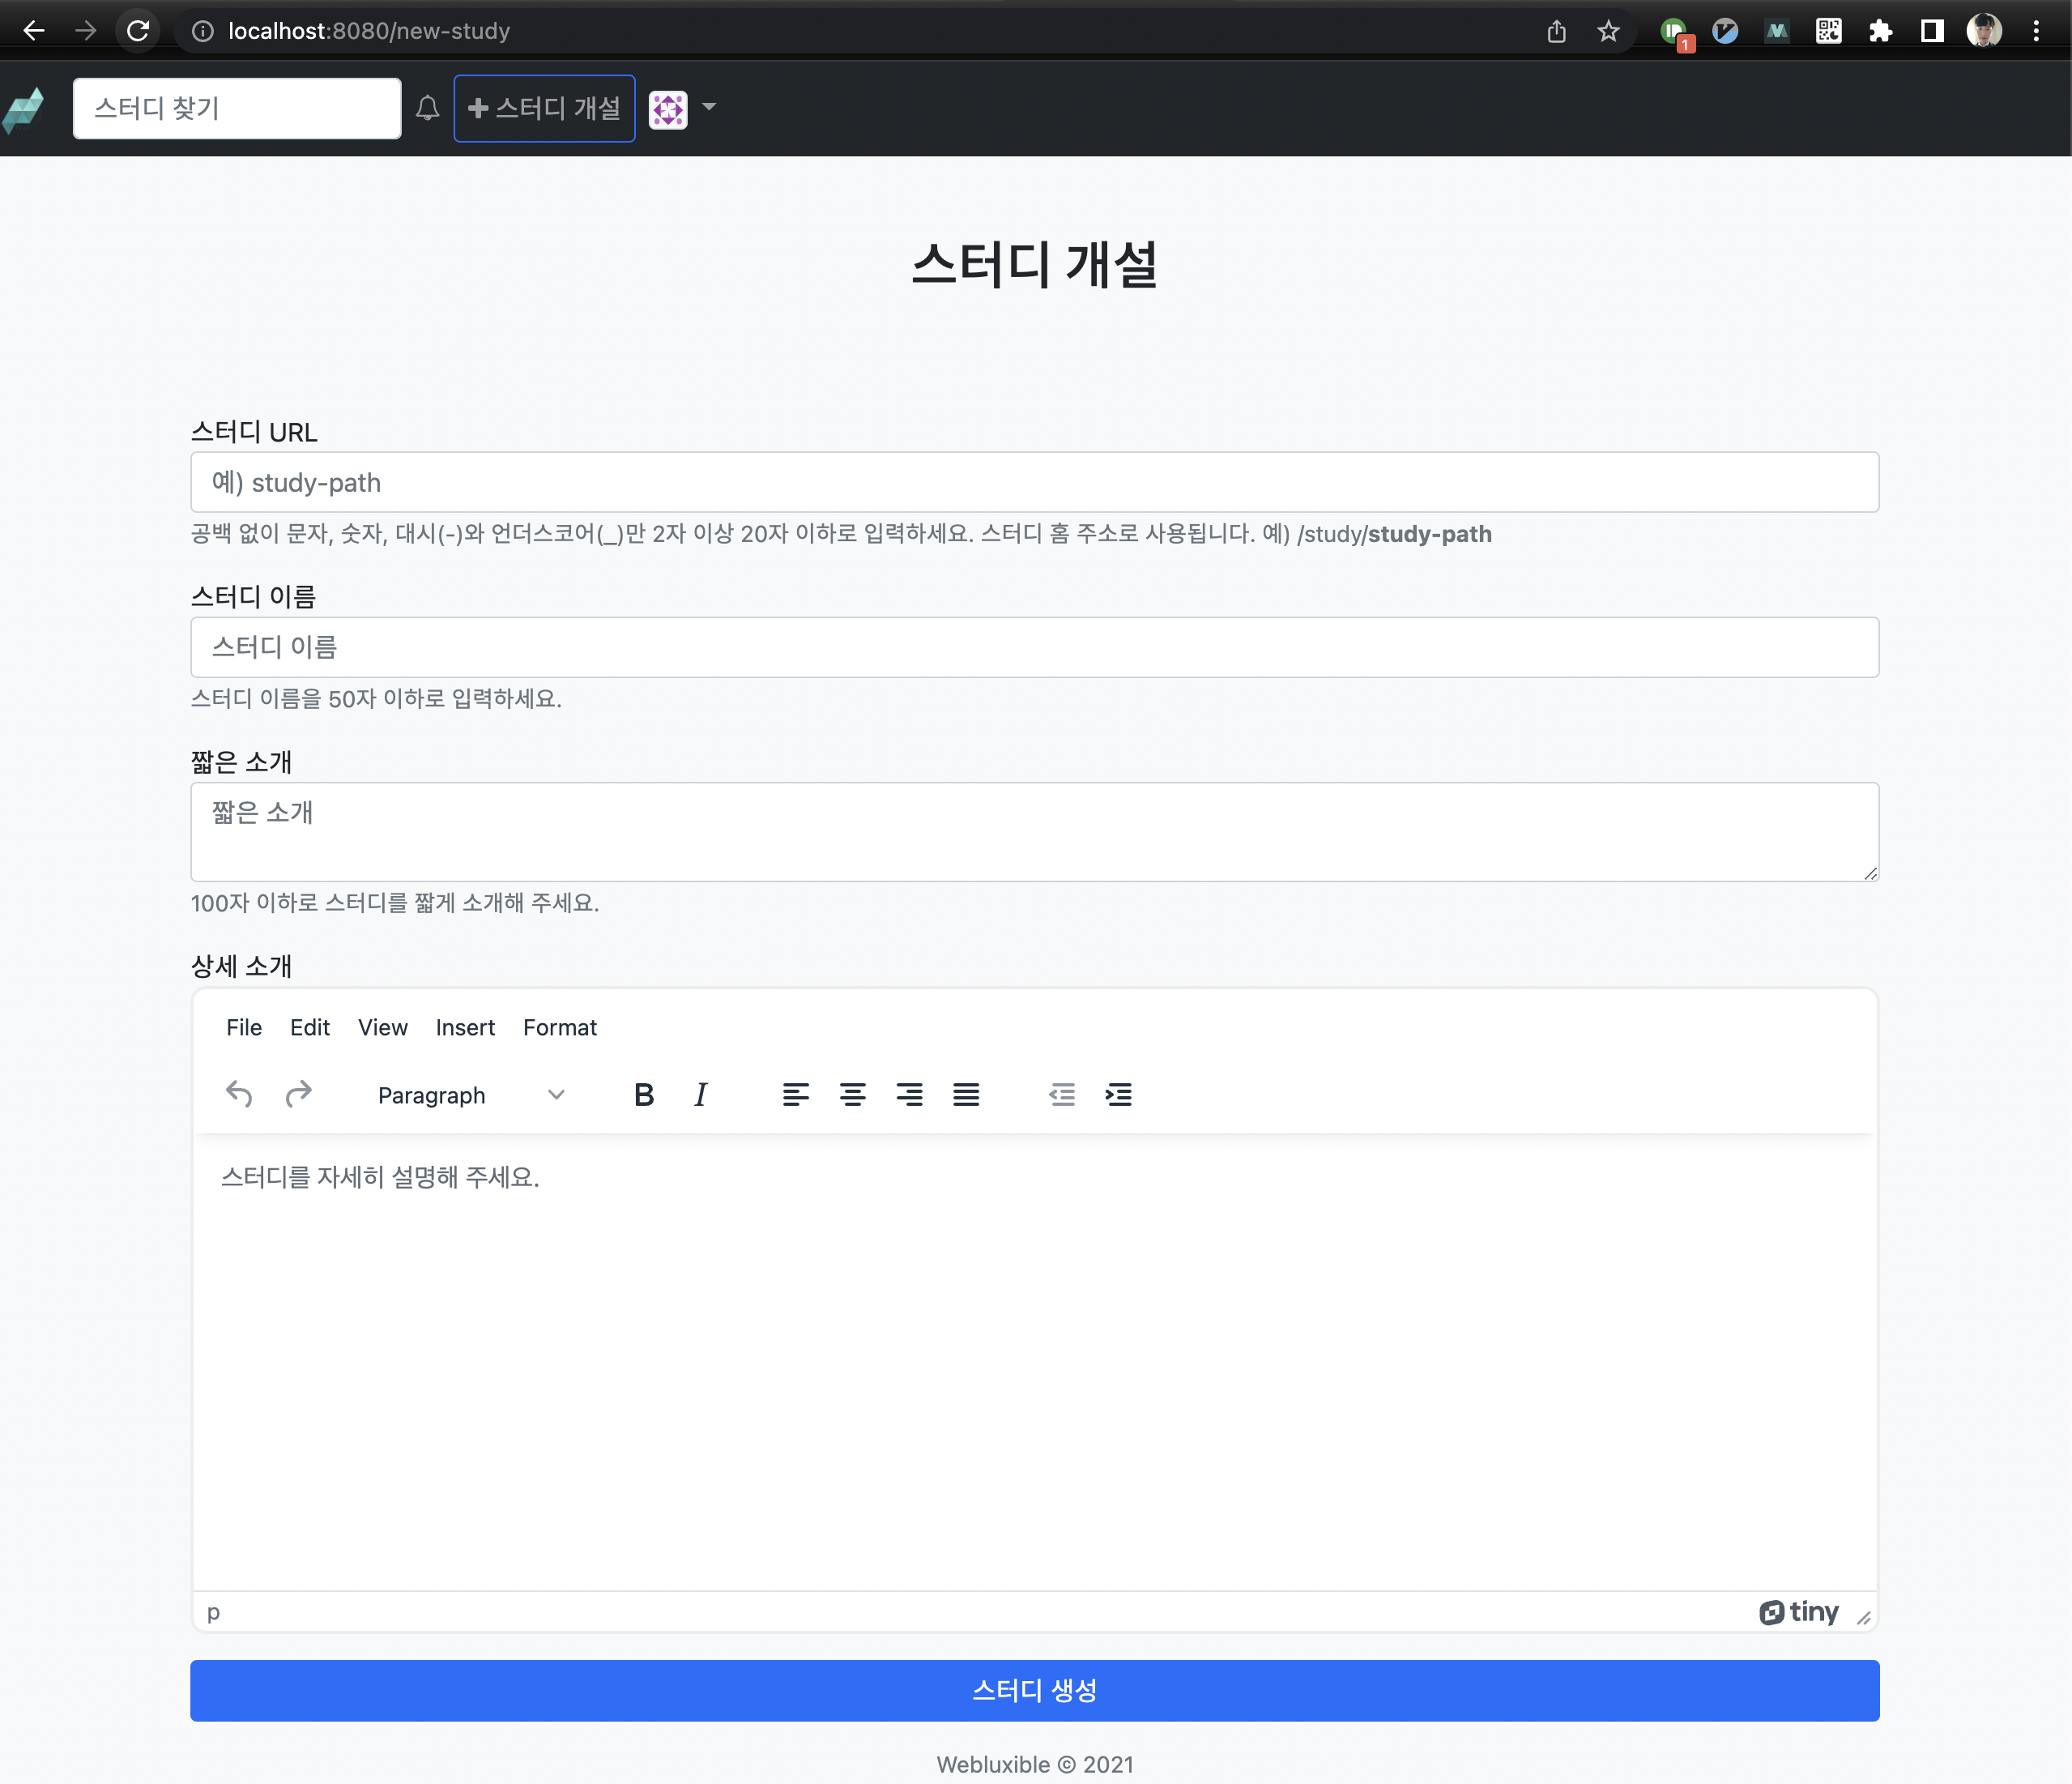
</html>스터디 개설 페이지 생성
템플릿 경로 하위에 study 패키지를 만들고 하위에 form.html 파일을 생성한 뒤 아래와 같이 작성합니다.
/src/main/resources/templates/study/form.html
<!DOCTYPE html>
<html lang="en" xmlns:th="http://www.thymeleaf.org">
<head th:replace="fragments.html::head">
</head>
<body class="bg-light">
<div th:replace="fragments.html::navigation-bar"></div>
<div class="container">
    <div class="py-5 text-center">
        <h2>스터디 개설</h2>
    </div>
    <div class="row justify-content-center">
        <form class="needs-validation col-sm-10" action="#"
              th:action="@{/new-study}" th:object="${studyForm}" method="post" novalidate>
            <div class="form-group my-3">
                <label for="path">스터디 URL</label>
                <input id="path" type="text" th:field="*{path}" class="form-control"
                       placeholder="예) study-path" aria-describedby="pathHelp" required min="2" max="20"/>
                <small id="pathHelp" class="form-text text-muted">
                    공백 없이 문자, 숫자, 대시(-)와 언더스코어(_)만 2자 이상 20자 이하로 입력하세요. 스터디 홈 주소로 사용됩니다. 예) /study/<B>study-path</b>
                </small>
                <small class="invalid-feedback">스터디 경로를 입력하세요.</small>
                <small class="form-text text-danger" th:if="${#fields.hasErrors('path')}" th:errors="*{path}">Path
                    Error</small>
            </div>

            <div class="form-group my-3">
                <label for="title">스터디 이름</label>
                <input id="title" type="text" th:field="*{title}" class="form-control"
                       placeholder="스터디 이름" aria-describedby="titleHelp" required max="50"/>
                <small id="titleHelp" class="form-text text-muted">
                    스터디 이름을 50자 이하로 입력하세요.
                </small>
                <small class="invalid-feedback">스터디 이름을 입력하세요.</small>
                <small class="form-text text-danger" th:if="${#fields.hasErrors('title')}" th:errors="*{title}">Title
                    Error</small>
            </div>

            <div class="form-group my-3">
                <label for="shortDescription">짧은 소개</label>
                <textarea id="shortDescription" type="text" th:field="*{shortDescription}" class="form-control"
                          placeholder="짧은 소개" aria-describedby="shortDescriptionHelp" required maxlength="100"></textarea>
                <small id="shortDescriptionHelp" class="form-text text-muted">
                    100자 이하로 스터디를 짧게 소개해 주세요.
                </small>
                <small class="invalid-feedback">짧은 소개를 입력하세요.</small>
                <small class="form-text text-danger" th:if="${#fields.hasErrors('shortDescription')}"
                       th:errors="*{shortDescription}">ShortDescription Error</small>
            </div>

            <div class="form-group my-3">
                <label for="fullDescription">상세 소개</label>
                <textarea id="fullDescription" type="text" th:field="*{fullDescription}" class="form-control"
                          placeholder="스터디를 자세히 설명해 주세요." aria-describedby="fullDescriptionHelp" required></textarea>
                <small class="invalid-feedback">상세 소개를 입력하세요.</small>
                <small class="form-text text-danger" th:if="${#fields.hasErrors('fullDescription')}"
                       th:errors="*{fullDescription}">FullDescription Error</small>
            </div>

            <div class="form-group my-3 d-grid">
                <button class="btn btn-primary btn-block" type="submit" aria-describedby="submitHelp">스터디 생성</button>
            </div>

        </form>
    </div>
    <div th:replace="fragments::footer"></div>
    <script th:replace="fragments::form-validation"></script>
    <script src="/node_modules/tinymce/tinymce.min.js"></script>
    <script>
        tinymce.init({
            selector: 'textarea#fullDescription'
        })
    </script>
</div>
</body>
</html>
기존에 작성했던 것과 대부분 유사한데, 위지윅 에디터 사용을 위한 코드가 추가되었습니다.
다양한 위지윅 에디터를 라이브러리 형태로 제공하고 있으니, 편한 것으로 설치하신 뒤 해당 라이브러리의 설명을 따라 코드를 작성하면 아주 쉽게 구현할 수 있습니다.
테스트
postgres DB를 실행시키고 local-db 설정으로 애플리케이션을 실행한 뒤 로그인 합니다.
기존 계정이 없으신 경우 가입부터 진행하시면 됩니다.
내비게이션 바에 스터디 개설 버튼을 눌러 페이지로 이동되는 것을 확인합니다.
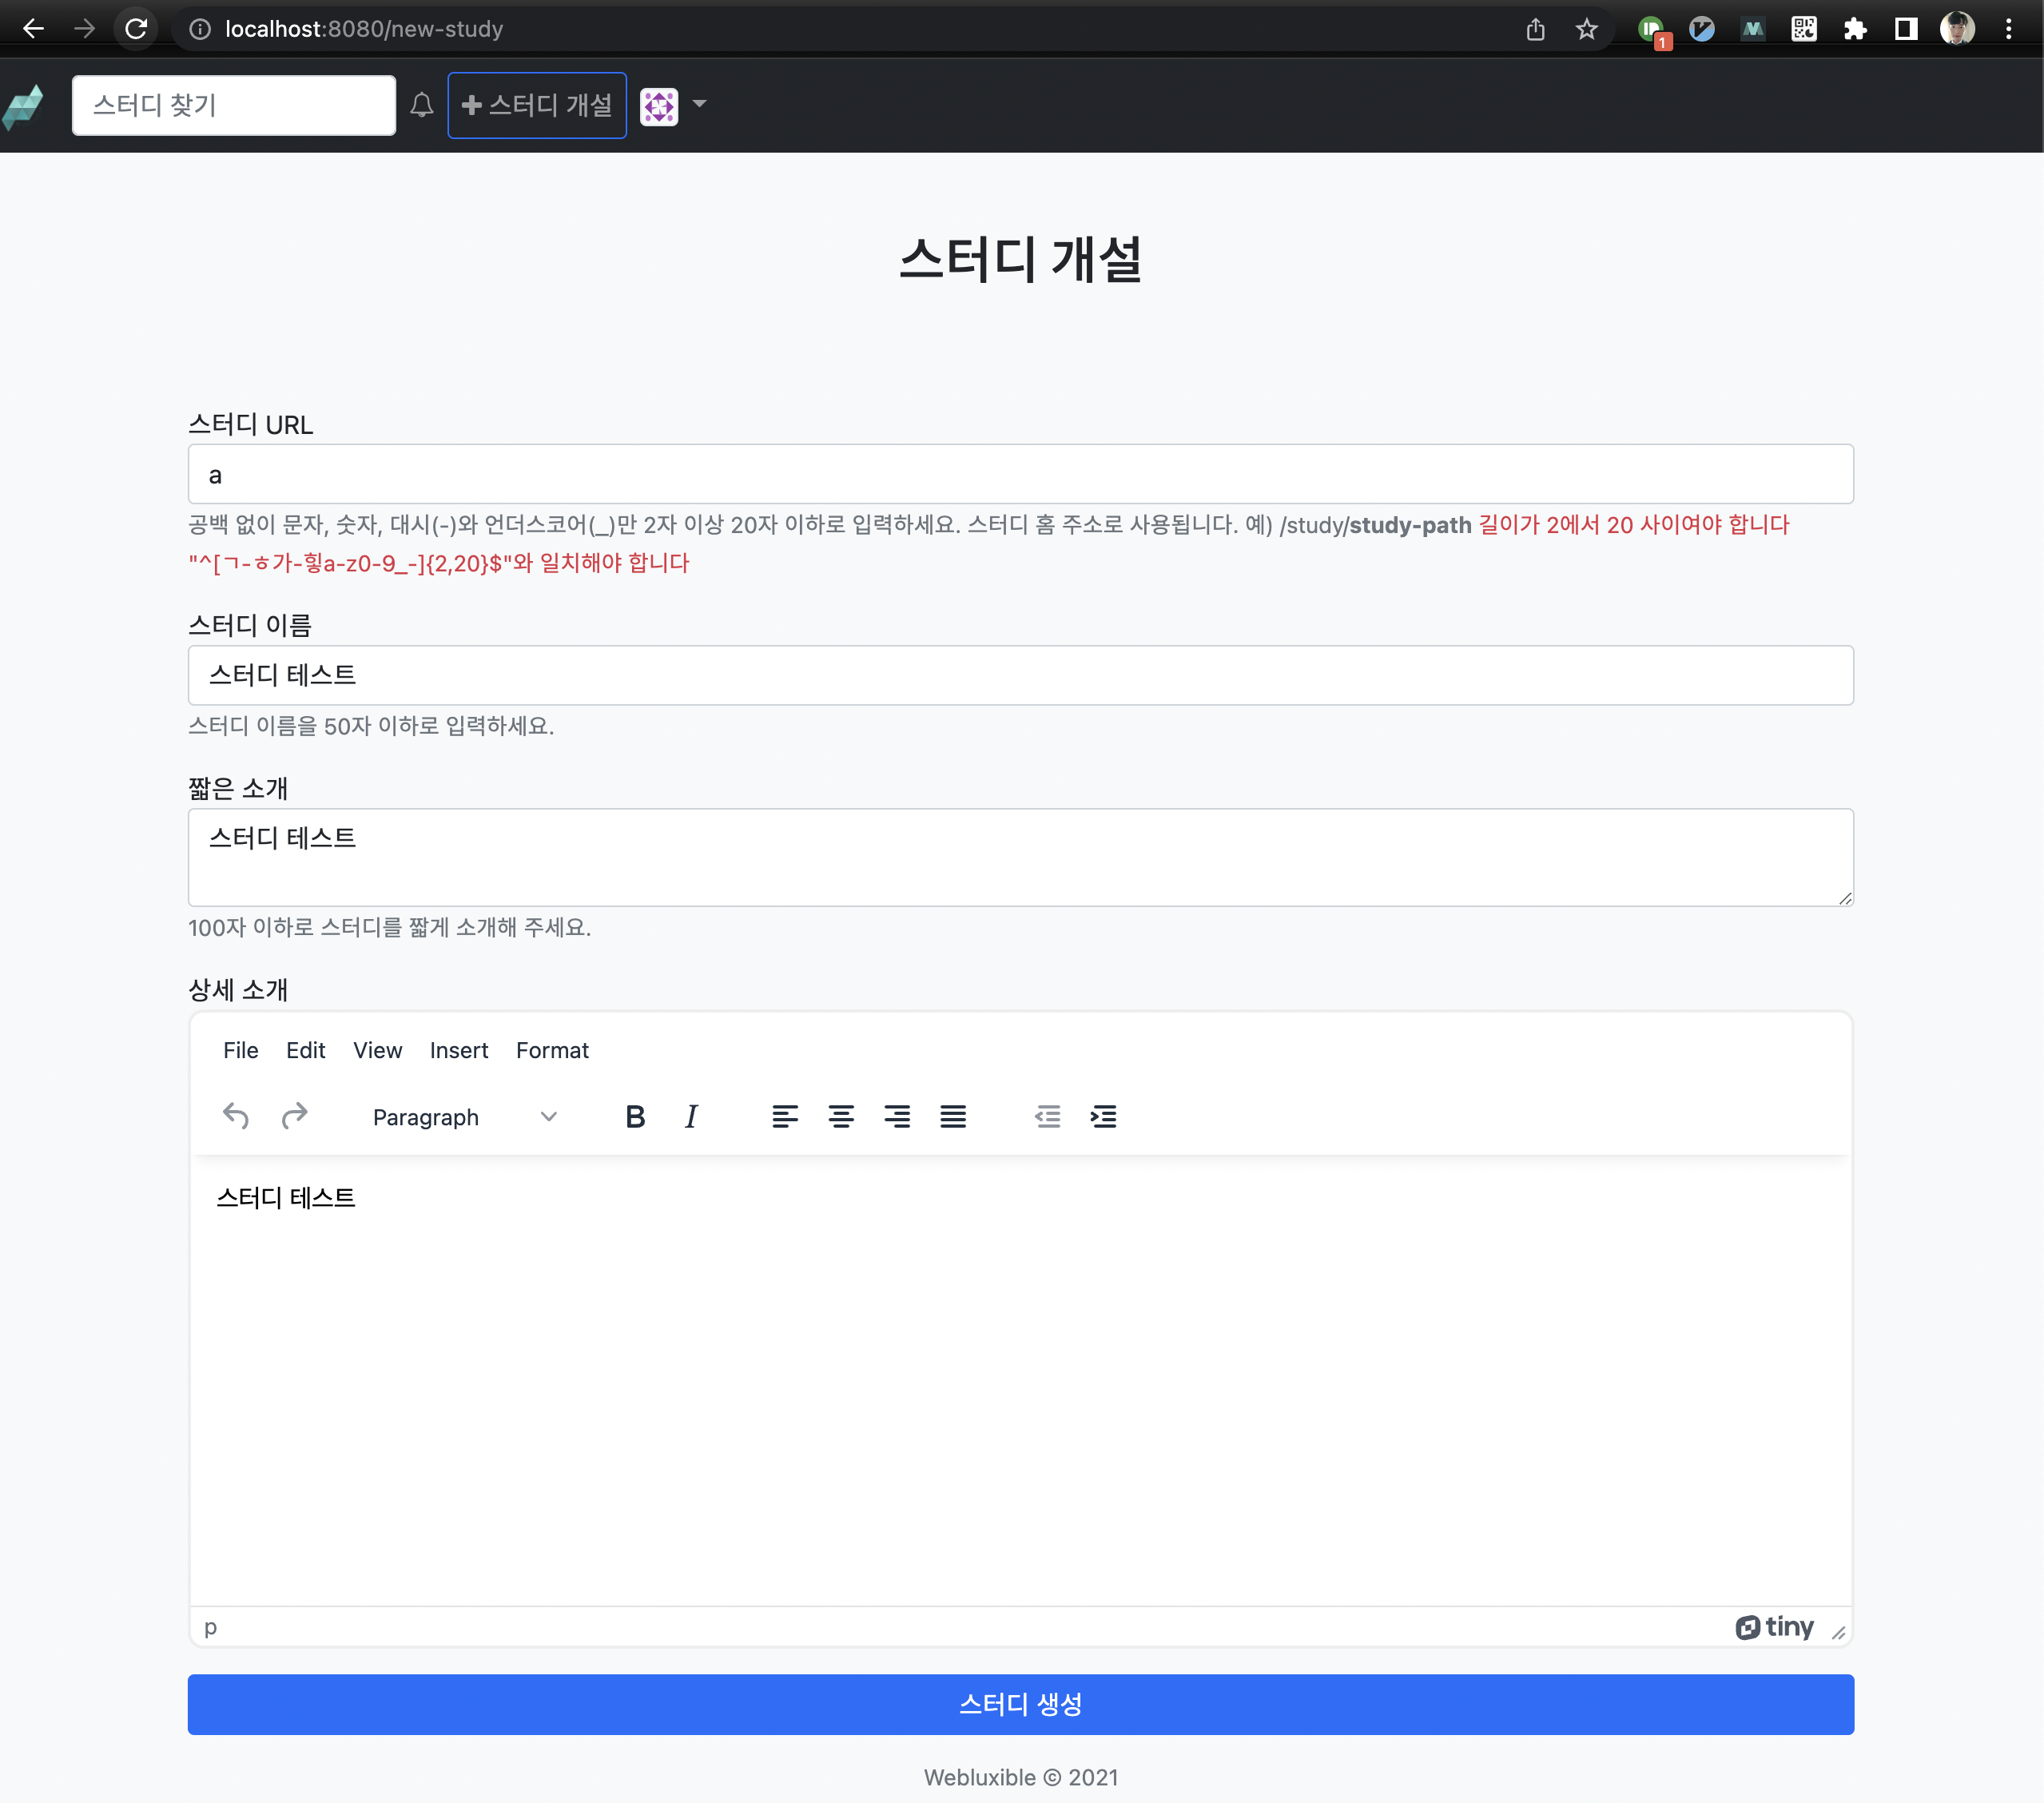
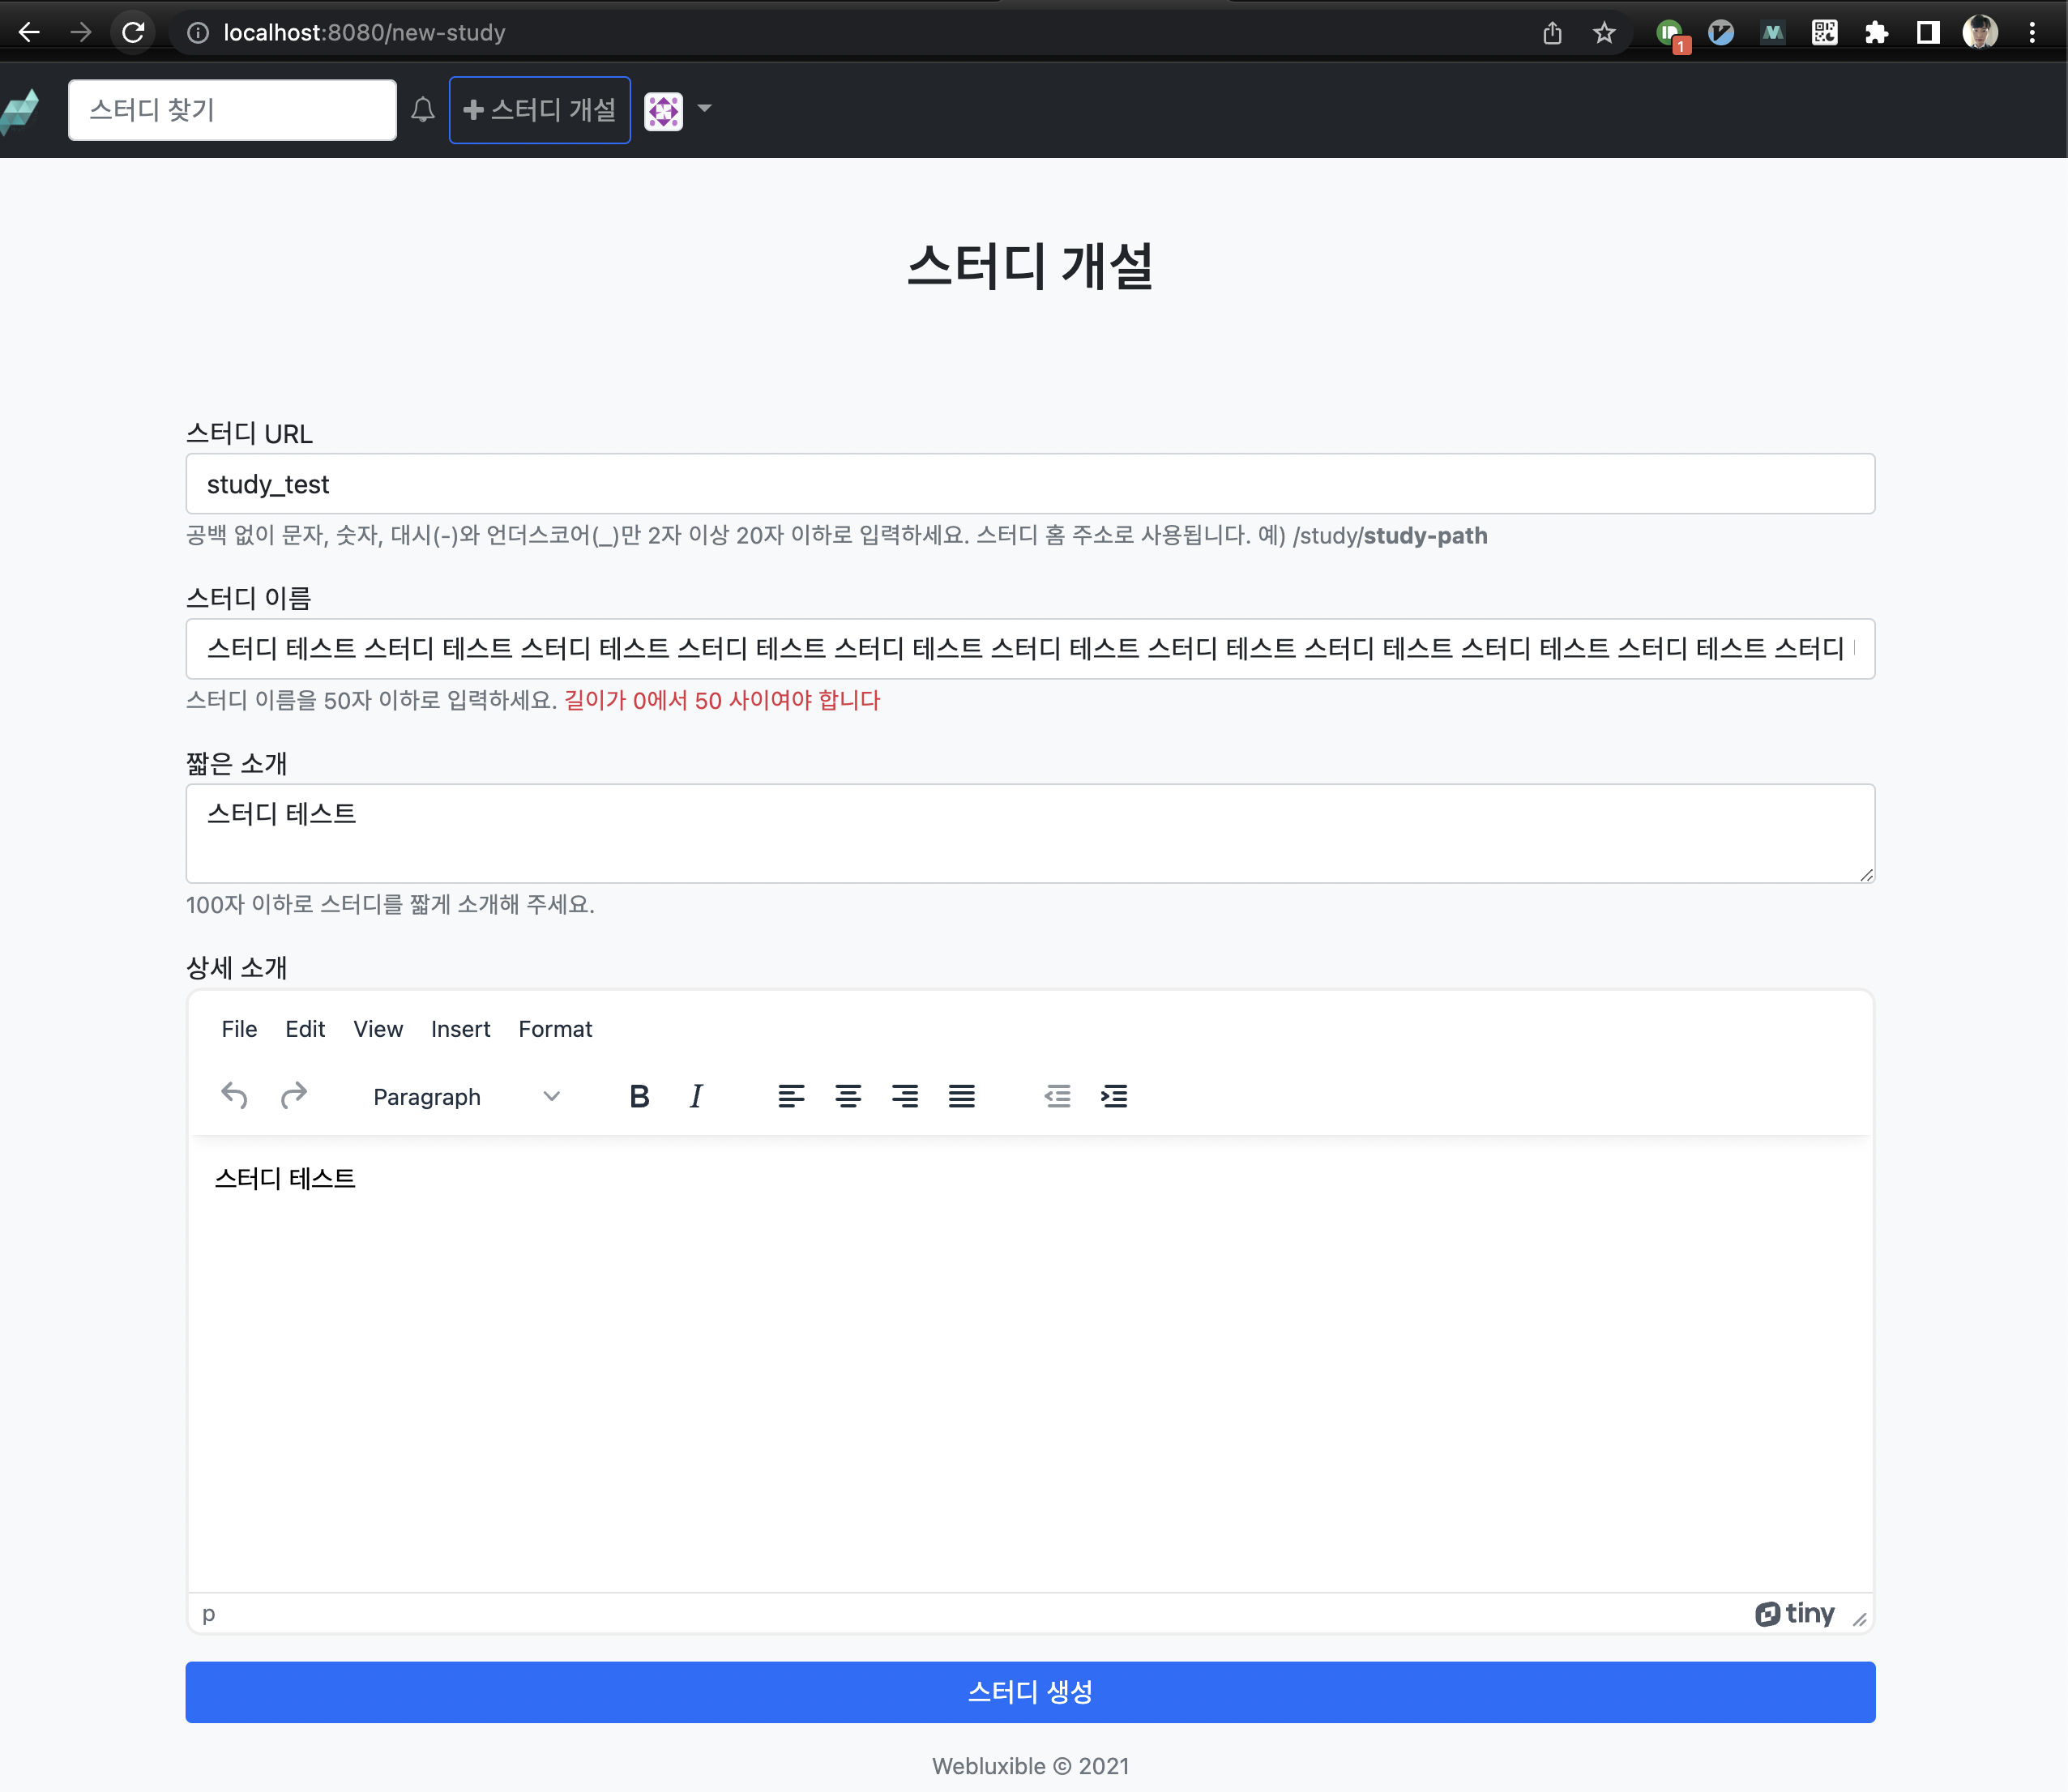
각각의 항목에 대해 validation 체크가 잘 되는지 확인합니다.
아무 것도 입력 안 했을 때
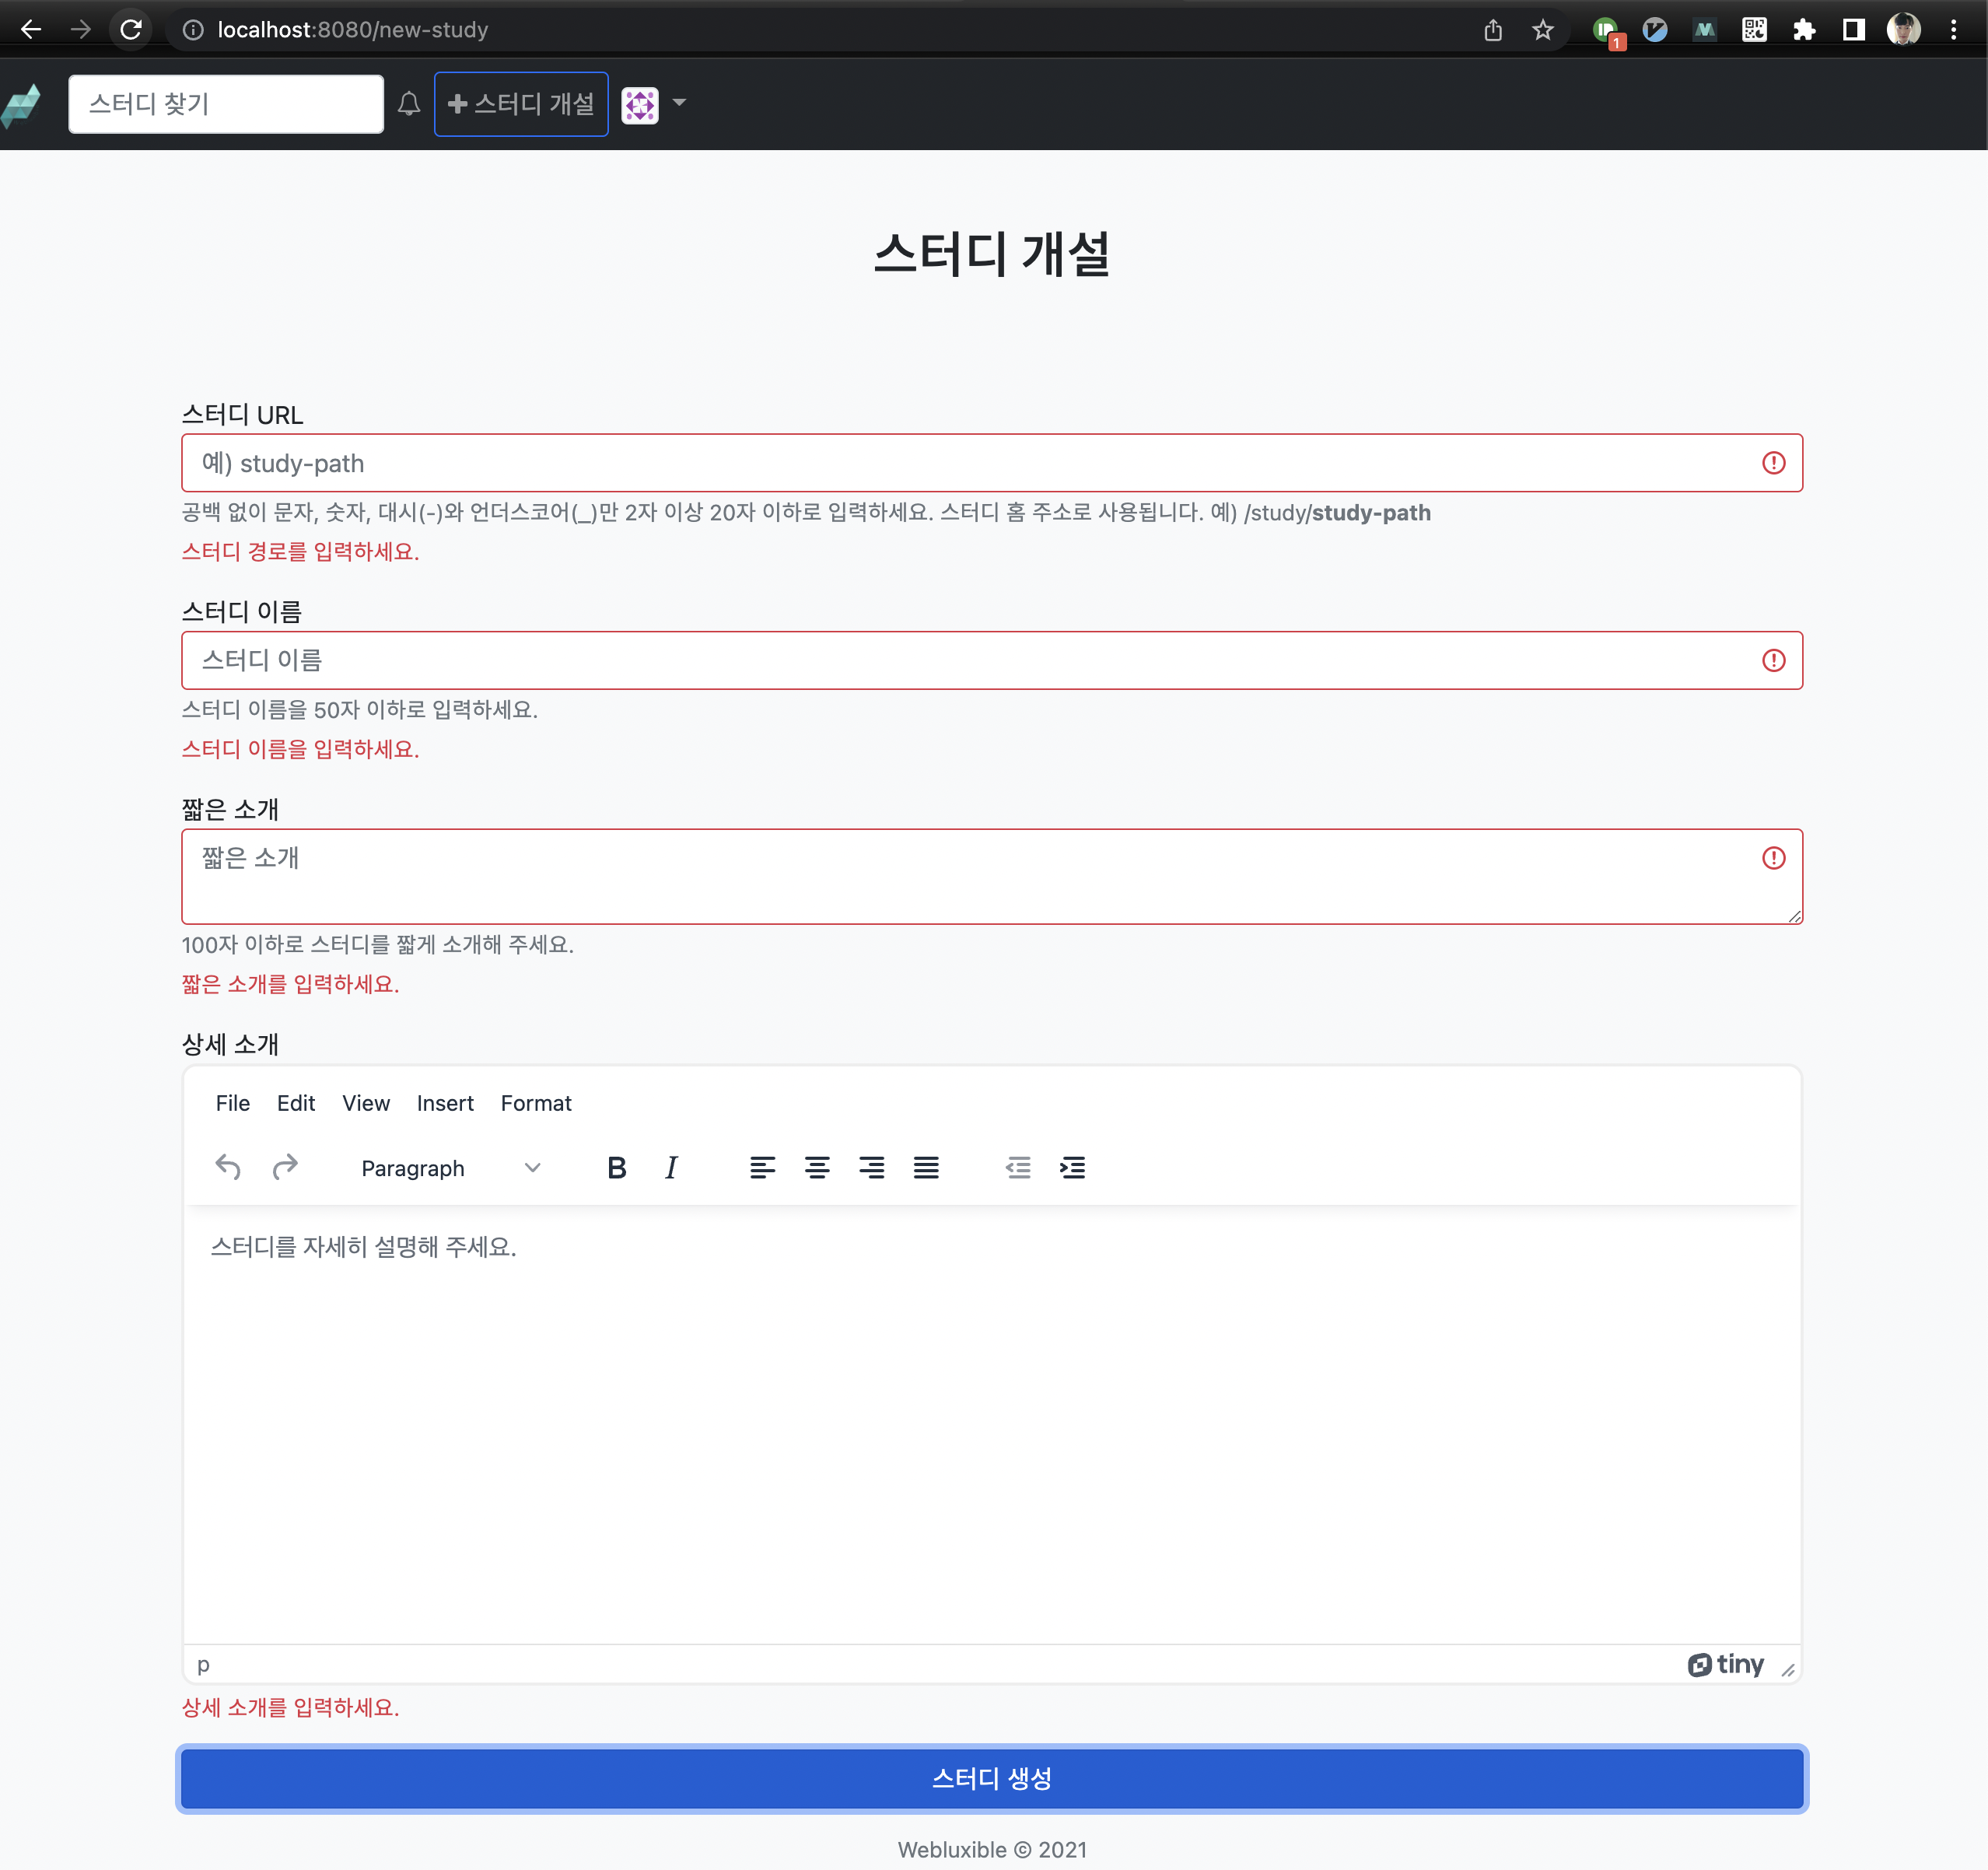
스터디 URL이 유효하지 않을 때
스터디 이름이 유효하지 않을 때
값을 정상적으로 입력하여 제대로 생성되는지도 확인합니다.


의도한대로 /study/study-path로 이동한 것을 확인할 수 있습니다.
아직 페이지를 구현하지 않았기 때문에 에러 페이지가 노출되면 정상입니다.
테스트 코드 작성
StudyControllerTest 클래스를 생성하고 테스트 코드를 작성합니다.
/src/test/java/io/lcalmsky/app/settings/controller/SettingsControllerTest.java
테스트 코드는 이전 포스팅에서 다뤘던 것들과 매우 유사하기 때문에 코드 첨부로 대체하겠습니다.
각자 테스트 할 항목을 잘 정리해서 기능이 정확히 동작하는지 확인해봅시다 😄
package io.lcalmsky.app.study.endpoint;

import io.lcalmsky.app.WithAccount;
import io.lcalmsky.app.account.domain.entity.Account;
import io.lcalmsky.app.account.infra.repository.AccountRepository;
import io.lcalmsky.app.study.application.StudyService;
import io.lcalmsky.app.study.form.StudyForm;
import io.lcalmsky.app.study.infra.repository.StudyRepository;
import org.junit.jupiter.api.DisplayName;
import org.junit.jupiter.api.Test;
import org.springframework.beans.factory.annotation.Autowired;
import org.springframework.boot.test.autoconfigure.web.servlet.AutoConfigureMockMvc;
import org.springframework.boot.test.context.SpringBootTest;
import org.springframework.test.web.servlet.MockMvc;
import org.springframework.transaction.annotation.Transactional;

import static org.junit.jupiter.api.Assertions.assertTrue;
import static org.springframework.security.test.web.servlet.request.SecurityMockMvcRequestPostProcessors.csrf;
import static org.springframework.test.web.servlet.request.MockMvcRequestBuilders.get;
import static org.springframework.test.web.servlet.request.MockMvcRequestBuilders.post;
import static org.springframework.test.web.servlet.result.MockMvcResultMatchers.*;

@SpringBootTest
@Transactional
@AutoConfigureMockMvc
class StudyControllerTest {
    @Autowired MockMvc mockMvc;
    @Autowired AccountRepository accountRepository;
    @Autowired StudyRepository studyRepository;
    @Autowired StudyService studyService;

    @Test
    @DisplayName("스터디 폼 조회")
    @WithAccount("jaime")
    void studyForm() throws Exception {
        mockMvc.perform(get("/new-study"))
                .andExpect(status().isOk())
                .andExpect(view().name("study/form"))
                .andExpect(model().attributeExists("account"))
                .andExpect(model().attributeExists("studyForm"));
    }

    @Test
    @DisplayName("스터디 추가: 정상")
    @WithAccount("jaime")
    void createStudy() throws Exception {
        String studyPath = "study-test";
        mockMvc.perform(post("/new-study")
                        .param("path", studyPath)
                        .param("title", "study-title")
                        .param("shortDescription", "short-description")
                        .param("fullDescription", "fullDescription")
                        .with(csrf()))
                .andExpect(status().is3xxRedirection())
                .andExpect(redirectedUrl("/study/" + studyPath));
        assertTrue(studyRepository.existsByPath(studyPath));
    }

    @Test
    @DisplayName("스터디 추가: 입력값 비정상")
    @WithAccount("jaime")
    void createStudyWithError() throws Exception {
        String studyPath = "s";
        mockMvc.perform(post("/new-study")
                        .param("path", studyPath)
                        .param("title", "study-title")
                        .param("shortDescription", "short-description")
                        .param("fullDescription", "fullDescription")
                        .with(csrf()))
                .andExpect(status().isOk())
                .andExpect(view().name("study/form"))
                .andExpect(model().hasErrors());
    }

    @Test
    @DisplayName("스터디 추가: 입력값 중복")
    @WithAccount("jaime")
    void createStudyWithDuplicate() throws Exception {
        Account account = accountRepository.findByNickname("jaime");
        String duplicatedPath = "study-path";
        studyService.createNewStudy(StudyForm.builder()
                .path(duplicatedPath)
                .title("study-title")
                .shortDescription("short-description")
                .fullDescription("full-description")
                .build(), account);
        mockMvc.perform(post("/new-study")
                        .param("path", duplicatedPath)
                        .param("title", "study-title")
                        .param("shortDescription", "short-description")
                        .param("fullDescription", "fullDescription")
                        .with(csrf()))
                .andExpect(status().isOk())
                .andExpect(view().name("study/form"))
                .andExpect(model().hasErrors());
    }
}
저는 폼 조회, 스터디 생성 정상 케이스, 입력 비정상 케이스, 중복 케이스에 대해 각각 테스트 하였고 모두 성공하였습니다!
'SpringBoot > Web Application 만들기' 카테고리의 다른 글
| 스프링 부트 웹 애플리케이션 제작(41): 스터디 멤버 뷰 구현 (0) | 2022.04.14 |
|---|---|
| 스프링 부트 웹 애플리케이션 제작(40): 스터디 뷰 구현(쿼리 튜닝, N+1 Problem) (0) | 2022.04.13 |
| 스프링 부트 웹 애플리케이션 제작(38): 스터디 도메인 설계 (0) | 2022.04.11 |
| 스프링 부트 웹 애플리케이션 제작(37): HTML 템플릿 생성 및 메일 전송 (5) | 2022.04.10 |
| 스프링 부트 웹 애플리케이션 제작(36): 메일 서비스 추상화 (0) | 2022.04.06 |
- Total
- Today
- Yesterday
- Spring Boot
- Spring Boot Tutorial
- JSON
- spring boot jwt
- Linux
- 헥사고날 아키텍처
- 함께 자라기
- spring boot app
- proto3
- 스프링 데이터 jpa
- 스프링 부트 애플리케이션
- Java
- QueryDSL
- r
- JPA
- @ManyToOne
- 함께 자라기 후기
- 스프링 부트 튜토리얼
- 알고리즘
- 스프링부트
- 클린 아키텍처
- gRPC
- Jackson
- leetcode
- spring boot application
- Spring Boot JPA
- intellij
- 스프링 부트
- Spring Data JPA
- 스프링 부트 회원 가입
| 일 | 월 | 화 | 수 | 목 | 금 | 토 |
|---|---|---|---|---|---|---|
| 1 | 2 | 3 | 4 | 5 | 6 | |
| 7 | 8 | 9 | 10 | 11 | 12 | 13 |
| 14 | 15 | 16 | 17 | 18 | 19 | 20 |
| 21 | 22 | 23 | 24 | 25 | 26 | 27 |
| 28 | 29 | 30 |